
Tagged: resin-techniques
- This topic has 3 replies, 2 voices, and was last updated 7 years, 8 months ago by
 Clinton Gallagher @tapABILITIES.
-
AuthorPosts
-
-
August 21, 2016 at 12:24 pm #6317
 Katherine SwiftKeymaster
This question comes through email by Jerry:
Looking for help… PLEASE !!!!
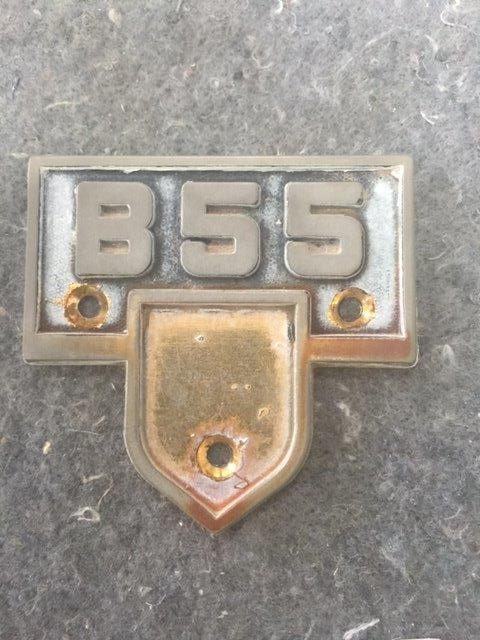
I attached a picture of badge that attaches to an airplane, and had the badge chrome plated, now I’m looking to fill in the background with a black resin.
So here are my questions:
Is black resin the right thing to use on this application?
If so, then do I need to cover the black resin with a clear coat resin as well?
How much would I need and how fast could I buy and have the resin(s) shipped to me in Houston, TX?
The badges are approximately. 2″ X 2.5″, so they’re not very big.
Any help, any advice would be very appreciated.

-
August 21, 2016 at 12:37 pm #6320Katherine SwiftKeymaster
Hi Jerry,
Resin should work well for your application. Before pouring the resin, you will need to do a couple of things to prep your badges:
1. Apply masking tape to the back over the holes. This will keep the resin from running out. Once the resin cures, you can remove the tape.
2. Use some fine grit sandpaper to go over the interior surface of your badge to give a ‘fresh’ metal contact spot. Sometimes resin can pop out of a metal casting later if there is a coating on the metal that keeps the resin from adhering fully.Once you have done that, most any clear resin, colored with black resin colorant should work well for you. If you want a ‘fuller’ look to the top, you may want to consider a doming resin. We sell several as shown in our resin buying guide: https://www.resinobsession.com/resin-frequently-asked-questions/resin-buying-guide/
-
August 27, 2016 at 5:03 pm #6376Clinton Gallagher @tapABILITIESGuest
Jerry, fill those three drilled mounting holes with modeling clay to keep them free of resin.
Katherine is right about bonding to metal although I would suggest also drilling several little 1/16″ or 3/32″ holes as sanding in that little space will hepl a bit but you want to allow the resin to seep into the little holes you drill to “key” the resin to the piece creating a sturdy friction fit which will impose resistance to airflow and drag over the piece that may otherwise suck the resin out of the piece during flight if it were just sanded up a bit which would only be neccessary in circumstances where extrenal forces are not involved.
IMO I would not POUR the resin into the piece. I suggest buying those little white plastic mixing stick paddles Katherine sells and using the paddle end to DRIP the resin into place (nd toothpicks too) giving you complete control of how much resin you use to control your dome and also using the tip of the paddle and toothpick to help the resin flow into corners, tight spaces and your key holes.
I might argue a bit and suggest using polyester resin as you may not want a dome on the finsihed piece which may remain after the cure because polyester shrinks into a convex (or flat) top surface when curing so if using polyester resin you dome when wet and it will flatten out during the cure. This is a but touch and go. Google: polyester resin vs alumilite and watch some YouTube videos. Katherine sells a polyester from CastinCraft as I recall and it too can be made opaque my only point being if you really want the resin to dome after cured which may conflict with the prominance of B55 which I somehow have the thought you want to remain prominent.
Either way because you are going to DRIP you can retain complete control of how much resin enters the void and simply hold back from filling to the top surface of the B55 characters. A very thin layer of resin will work just as well because you are key locking the resin to the piece.
-
August 27, 2016 at 5:14 pm #6377Clinton Gallagher @tapABILITIESGuest
I forgot to comment about a clear top coat so yes, simply key the black layer and then puddle over the black layer with clear to seal and cast B55 into a dome. You do not have a lot of depth to work with but both layers of resin will chemically bond to each other and you can drill out your mounting holes after the resins have cured.
The clear top level could be domed in that case Alumalite will work out very well for both layers just hold back from top surface of B55 a bit when casting the black layer and allow to cure before proceeding with top clear layer. As I said its touch and go as you do not want B55 to appear sunken as cured resin reflects light very well and can and will give that effect if you do not control how the top surface does or does not dome.
Watch Katherine’s Resin Obsesstion YouTube videos they are unequaled.
-
-
AuthorPosts
- The topic ‘Adding resin to a badge’ is closed to new replies.