
So you want to learn how to dry flowers in a microwave. That’s cool. Or that’s hot. Depending on who you ask.
Why dry flowers in a microwave?
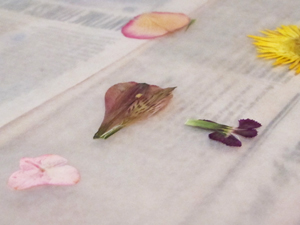
Most importantly, because fresh flowers turn brown in resin and look like dog 💩.
So you’ll definitely need to dry them before including them in your next resin project. And there are pros and cons to drying flowers in a microwave.
Pros:
Instant gratification! In under five minutes, you can have dried flowers to use in resin.
Cons:
There is a bit of a learning curve. You’ll need to try a few times to determine what works best with your microwave wattage.
Your flowers will come out flat. There isn’t a good way to keep them three-dimensional. But I’ve got a fix for that in a minute.
💡 Pro tip: Don’t start with your favorite flowers. You’ll fail at a few, and they’ll end up crispier than a day at the beach without sunscreen.
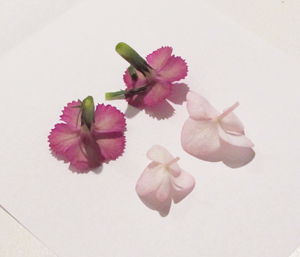
Step 1: Place flowers on paper
Take fresh flowers and place them onto a rectangle of white office paper. Then, fold the paper over onto the top of the flowers.
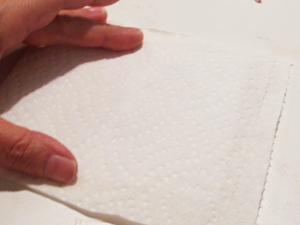
Step 2: Place in a paper towel
Next, put the paper, with the flowers inside, into a folded paper towel.
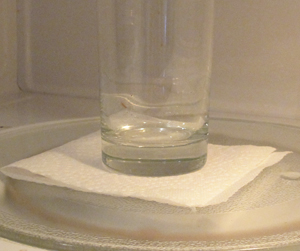
Step 3: Nuke ’em
Place the flower sandwich into the microwave. You’ll need a heavy, flat-surface item to press onto the flowers during warming. Then, microwave your flower sandwich on high for 30-second increments.
💡 Pro tip: For my microwave, I found 1 minute to 1 minute, 15 seconds was best for drying the flowers. And glass will get SCREAMING HOT when you do this. And might even crack. 😭
Ta-da! You just learned how to dry flowers in the microwave.
I think if I were going to do a lot of these, I would invest in this microwave flower press.
But what if you don’t want flat flowers?
Then you’ll want to dry them in flower desiccant. It takes 1 to 2 weeks to do this, but they’ll maintain their natural shape.
And when you’re ready to preserve your flowers in resin, we’ve got the clear epoxy to make it happen.
Now that you’ve got dried flowers, how do you use them in resin?
I’ve got you. Buy your copy of the ebook Resin Fundamentals. You’ll learn from my 17 years of resin experience to get to pro status in only a couple of hours. Buy the PDF book now and get a download link in minutes.
Unpublished Blog Posts of Resin Obsession, LLC © 2023 Resin Obsession, LLC
Dag nabbit good stuff you whaenerspippprs!
This is interesting, I have never thought that the flowers would be dry enough…..guess I will have to try!
Little trick I learned last year when I tried this a few times… get some plain stone tiles from the home improvement store, they are safe to use in your microwave, heavy, and large. I used two (one on top/one on the bottom) and the same sandwich you did, also tried it using pieces of cotton in place of the paper towel though I didn’t see any real difference.
I have a glass pie “tin” I use for microwave flower drying though a stone tile would likely be more drying space.
@Ronny, I think I would try them with the contact paper method. You can see what I’m talking about here: https://www.resinobsession.com/Resin-Resin-Resin/505/Drying-flower-petals-on-contact-paper.html
I wonder how you could do an Easter lily?
To have it not be flat, that is. Prop the petals somehow?
Hello,
What I use for more dimensional results, or with delicate flowers, I actually use kitty litter! If you do not want to wait the traditional 14 days. Add about an inch on the bottom of a microwave safe container, carefully add more kitty litter on the sides and tap gently to surround the flower without damaging it. Once this is done fill it in, leaving another inch at the the top above the flower. Microwave for a minute, there may be differences with microwaves. Leave top off ( I would avoid using a microwave you utilize for food), remove and set a lid lightly on the top leaving it cracked open to vent, remove carefully after 24 hours. I use this on Roses. I think it may work on Lilies. I’m going to try some Asiatic Lilies from my garden today.
Neat idea! I’m going to have to try that.
What type of kitty litter, or any kind? We have a cat, I can steal some of the litter from the back (clean, unused) but it’s the wheat kind.
I wonder if vermiculite would also work. When I fire PMC silver, I have to bury it in that. It’s a volcanic non rock material and extremely light, but will take all the heat you want to give it. Also, absorbs any moisture in the buried item. Hmmmmmmm. I’ll have to try that and let you know.
Hi there! I an sooo excited to see the info on the microwave drying and hints! I have 2 questions for you though:
1. Why use the office paper, not just paper towels or fabric? Is it to prevent patterns being imprinted or another reason?
2. How do you know if the flower is “dry enough” to seal & resin? Is there something specific to look for?
Thanks in advance!
The office paper seemed to dry out the best for me. I don’t know if there is an easy way to tell if the flowers are dry enough except they were ‘crispy’.
Neat but don’t put drinking glasses in a microwave, the glass is not made for heating and can shatter or ‘splode, no kidding! Pyrex (it’s made for heating) is fine and a pyrex baking dish works great. 🙂
I tried this. 1 min was perfect. 1.15 started a fire in the microwave.
Please be careful when trying this.
Oh goodness Shelley, it was a good thing you were there to catch that!
Another video recommends microwaving at half power if you are cooking for over 1 minute.
I tried this microwave technique but when i use those flowers for my resin works rhe colour of the flower changes can i no why
Hi Nisha, I’m sorry this happened. Maybe the flowers got too hot and started ‘cooking’?
Some flowers do change drastically if you heat them too hot and all flower colours will change slightly while drying them, I’ve not yet come across many that don’t and the only ones i can say haven’t are usually white ones.
I coat them in silica give them a quick 30 second blast in the microwave on low then leave them sit in the airtight container 24 hrs pop them in the microwave again 24 hours later for another blast and do this for 3/4days days and usually by this point smaller/thinner flowers are ready but thicker roses take slightly longer and they do tend to keep their colour well this way x
Ooo ok thank u for the reply
thanks guys Im experimenting now with an old bag of brown rice and quinoa no one has gone near for a year. On the pretext that I can usually dry my phone and charging cord out with a bowl of rice. I have heated it in the microwave and placed my Gerbera in it as it cools again on the kitchen table 🙂
Use a large corningware bowl. They have flat bottoms and give you a decent amount of space to work with. Plus they are nice and heavy.
I use exactly the same method with the printing paper folded with the flower inside and also with a paper towel on top and underneath the printing paper. Instead of placing this onto the microwave plate and using a glass for weight, I use a ceramic tile underneath and another tile on top, with the flowers, printing paper and paper towels sandwiched between the shiny sides of the tiles. I then microwave for 1 minute on high and then 1/2 a minute on half the power. Sometimes, depending on your microwave wattage and the thickness of the flowers, leaves etc. you need to change both papers and microwave them a second time on half power for another 30 seconds (you can repeat these 30 seconds until your flowers, leaves etc. are dry). When you do this process the first time, the paper towels come out completely wet and the printing paper also. I then keep my different flowers, leaves with little berries etc. sandwiched between paper towels on different pages of a relatively heavy book.
By the way, to answer a question I saw above, you cannot microwave flowers directly on paper towels because the petals will stick to the paper towel and will tear when you try to take them off.
Sorry about the novel🤭
A ceramic tile. That’s a great idea! That won’t crack in a microwave!
Any updates from Missy and the rice method?
How do you seal the flowers after microwaving?
How would i dry out a flower in microwave with out Squashing it ?
Hmm, Kandace. I don’t know how you would do that.
I’ve dried many flowers in the microwave. I recommend a square tempered glass dish (pyrex) and then I cut a scrap fabric (basic quilting fabric) so that there was two layers over and two under and microwave.
Just found this article, most helpful information, thank you for sharing. I have been ‘playing’ with flowers for quite a few years and still learning from others. I use a microwave flower press. It consists of a microwave proof tile with clips to hold it together, inside are 2 layers of thick felted wool and 2 layers of cotton fabric. I sandwich the flowers between the layers and zap for about a minute, then if necessary I usually do 10 second intervals until I think is is dry. This will depend on the flower you are drying. I dry by simply hanging to dry and I also use crystal kitty litter to dry flowers. I usually leave them for around 4 weeks covered in the crystals just to make sure they are dry. I used to put a lid on but I don’t bother to put a lid on the container now as I couldn’t see any difference in the end results. I use a mask and wear gloves to avoid contact as a precautionary measure as I couldn’t find much information about contact with the kitty litter crystals. I use the end results for a variety of different projects/crafts including resin. Just find I need to keep projects out of direct sunlight as most will go brown.