
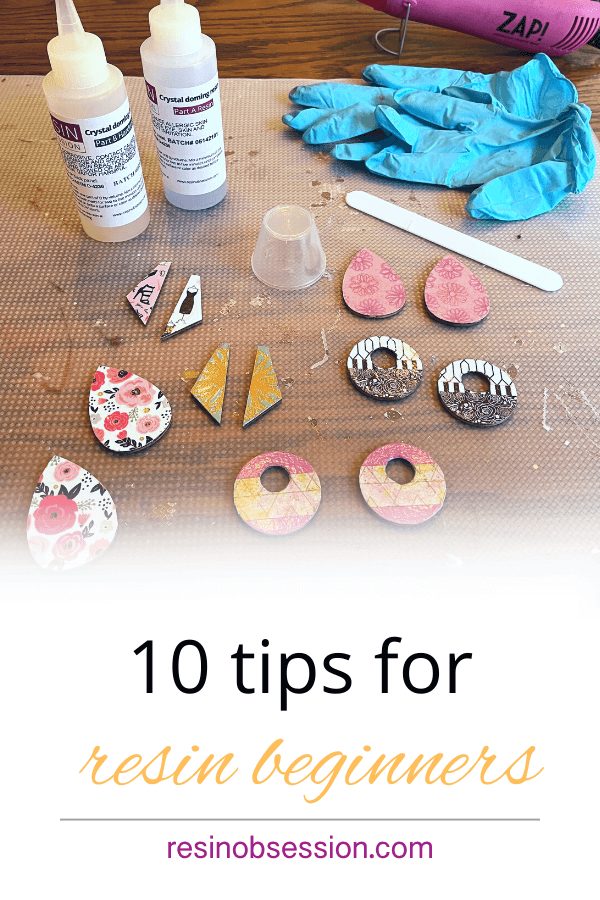
 So you’re ready to try crafting with resin. And you aren’t sure if you’re heart is skipping a beat because you’re excited or nervous. Well resin beginners, here are my best tips for you to fast track you through the newbie phase.
1. Never be afraid to try something new.
Think of what you’re doing as an experiment. Then, if it doesn’t turn out exactly as you planned, you might discover something new. It’s how I deal with my perfectionist anxiety.
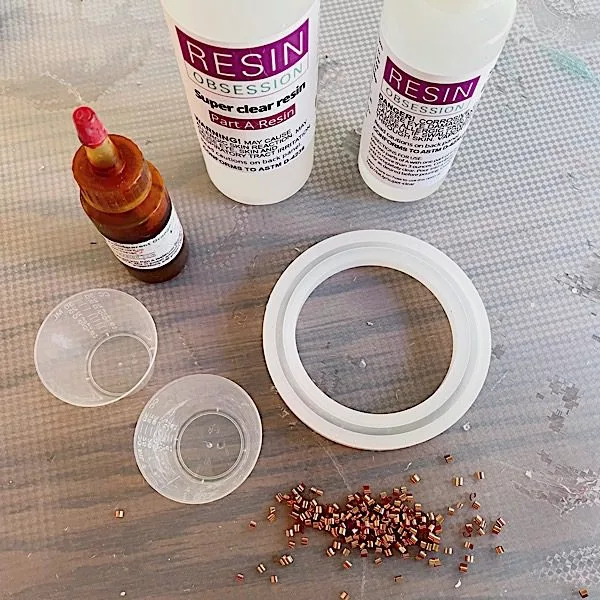
2. Always wear gloves.
Nitrile gloves are great. They’re durable yet thin enough that you can feel what you’re doing, unlike many plastic gloves that come in most resin kits or hair coloring kits.
3. Always cover your work surface.
Wax paper works wonderfully for this. And here are some other surfaces resin won’t stick to.
4. Wear clothes that can be ruined.
Resin drips will not come out of clothing.
5. Protect your work area.
If your crafting table sits over a nice carpet, put down a drop cloth wider than your work area.
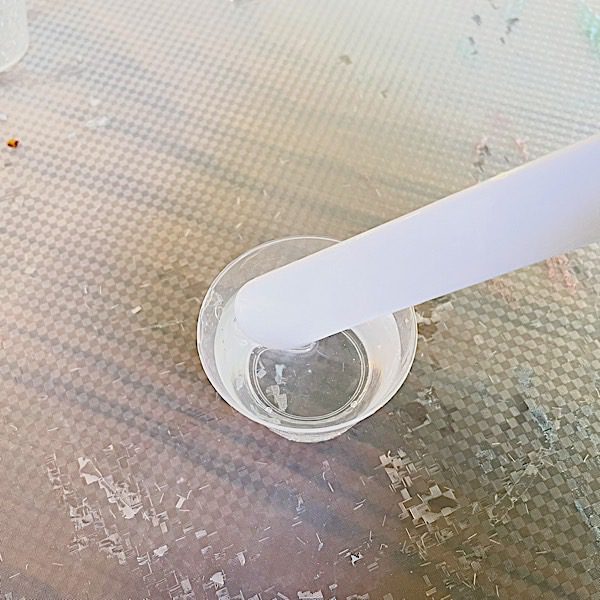
6. Mix SLOWLY and scrape the sides and bottom of your cup often.
Here’s how you can mix resin and hardener in five easy steps.
💡 Pro tip: If you only remember one of the resin tips for beginners on this list, this one is it. Undermixed resin is what makes sticky spots.
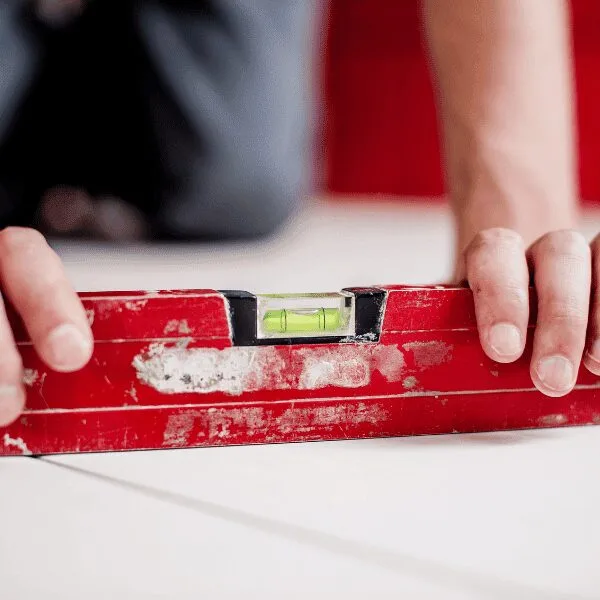
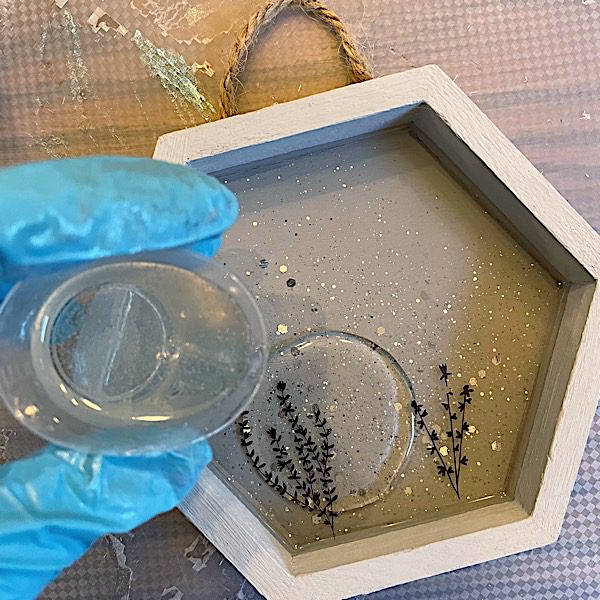
7. Cure your resin in a location that’s level.
This means from all angles.
8. Avoid touching your epoxy resin until it’s cured.
Look at the instructions with the resin kit to know when that happens.
9. Relax, you can fix most “boo-boos.”
And if you can’t, here’s what else you can do with your resin mistakes.
10. Enjoy the learning process.
Always keep in mind a piece of great advice from Bob Ross: “There are no mistakes, only happy little accidents.”
Confused by all the resin information out there?
How do you sort through it all? That’s why I wrote the PDF ebook Resin Fundamentals which is full of resin tips for beginners. I’ve condensed my 17 years of resin experience into the essential details I wish I had know when I started making resin crafts. Buy the ebook now and go from confused to confident with resin in only a couple of hours.
Unpublished Blog Posts of Resin Obsession, LLC © 2023 Resin Obsession, LLC
What is most important thing to remember when putting resin on a 24 x 36 inch abstract painting
I would say be prepared with everything you need and act quickly once your resin is mixed. You don’t want to be distracted in the middle of a pour only to find your resin is starting to cure and your painting isn’t covered yet.
I shared this post on my Pinterest so my friends can see it and now they don’t want me to share it with other’s because of some copy right stuff . but the. I never said it is was mine lol so. They don’t know what they are doing besides losing advertising. And free advertising at that too. So I guess they must be really dumb.
I am really curious as to why this is an issue? I work in marketing and we want people to share our work that’s the best kind of advertisement as it’s free!!
Make sure your WHOLE work area is covered with a drop cloth of some kind far bigger than the painting. Drips will happen.
Also make sure your painting is elevated on spikes or poles of some kind and the bottom edges of the sides do not touch anything. This will prevent it becoming one with your work surface as the resin cures.
Make sure your entire working area is cleaned off and is covered by a drop cloth, no gaps.
The place you pour will be the place you cure. Make sure your painting is level (use a bubble level not your eye).
If possible, cover your painting while it is curing but in a way that the cover does not touch any part of the painting (or any resin drips). Or, at least make sure it is in a place that nothing can disturb it and stray hair can’t find its way on to it.
Do you mean drop cloth or plastic drop …..tarp or something? Wouldn’t it go through cloth? Thanks!
Never done anything like this. I have no supplies. I just wanted a couple things really.
I wanted to have a makeup brush holder with alcohol ink. Then I wanted a phone case for my phone as well.
Tried to find stuff to buy but im picky and I haven’t found anything I liked. So I figured I should just make it my own.
Any advice?? Thanks!!
One more comment about Nitrile gloves: if you are, like me, sensitive or allergic to latex, Nitrile gloves have no latex whatsoever and so are ideal.
I may have put to much acrylic paint into the resin trying to tint it and now it wont cure. Its been a week and its still sticky and pliable. Is there a way to fix this or make it cure still?
Unfortunately, no. You can try applying heat to it with a heat gun, but I’m not hopeful that will work.
You should only be putting about 10%-15% acrylic paint into your mixed resin. The water in the acrylic paint affects the curing of resin greatly. I would recommend using higher quality, fluid acrylics, like Golden high flows and/or fluid paints, Liquitex acrylic inks or soft body paint, Daler Rowney FW acrylic inks, or Amsterdam acrylic inks (I’m sure there’s more brands out there, I’m just naming what I use). The higher quality acrylics have much more pigment in them than the cheaper acrylics. Also, if it’s just that you want to make a particular color more opaque, just add a drop or two of white and that should help. Adding more of a transparent color isn’t going to make it opaque, it’s going to stay transparent, and you’ll end up with the problem you have now if you add too much.
As for the painting you already poured, you can try adding another layer of just clear resin over it- just make sure you’re measuring it exactly right and mixing it extremely well. This has worked for me before. Good luck!
Since it may already be ruined no danger in trying to salvage it, try a coat of clear resin called a flood coat on cups it might work and if not wouldn’t be too much of a loss
I’m a newbie to resin, I live in the metal stamp and glass world, but I have tons of pressed flowers left by my mom and I want to use open frame pendants with resin for flower pendants
What should I buy..needless to say I’m glad to buy from you or any affiliate you may be working with!
I have everything needed other than the actual resin. Thanks for any help
I would suggest starting with one of our beginner kits: https://shop.resinobsession.com/collections/kits/products/resin-beginner-kit-with-clear-resin It should let you get started with making things with resin right away.
I want to start using resin. Do I have to buy a specific one? I live on an island so I dont have to much access of things. Here they sell resin to repair surfboards, can I use that one?
Thanks
Surfboard resin is most likely polyester resin. Yes, you can use that kind, but I would suggest reading this article first: https://www.resinobsession.com/resin-resin-resin/polyester-casting-resin
Am a beginner what should l buy as a starter kit for making jewellery
This is where I recommend beginners start: https://shop.resinobsession.com/collections/kits/products/resin-beginner-kit-with-clear-resin
Does the quality or outcome of a dirty pour differ if I mix the paint with resin before I pour, or is it more practical (less wasteful) to just put a coat of resin on after the paintings done? Also, what’s the best resin to use for a canvas painting, epoxy, fiberglass, or polyester?
Hi Maddie, as for your first question, I suppose it comes down to your personal preference. You will achieve a different look if you mix the resin with paint before pouring as opposed to painting, then pouring on the resin later. You will want to use an epoxy resin for resin painting. We have several here: https://shop.resinobsession.com/collections/resin Polyester/fiberglass resin (same thing) are not self leveling and will not work for resin art purposes.
I don’t have torch to remove the bubble in the pouring technic can I use hairdryer instead please advise
Yes, but the force of the air may move the resin more than you want it to.
You could also try a heat gun/embosser, but you’ll have the same problem with the resin mixture moving from the force of the air.
I live in a country where there’s no imported goods come in,..and i have some resine that i bought in my last trip,…but now i need to know,..if i can use a silicone place mat used for baking cookies’ will the resine stick to it? if it works i wont be using it again for cooking purposes thanks.
It shouldn’t stick to it.
Hi. I love your lesson about resin. I need to now more.
Hi Katherine. I have a question for you: I am new to resin, and I’m using “Castin’ Craft” brand polyester resin in a thin layer to seal a project. When I did the pour, the surface looked smooth, glassy, and perfect. After about an hour, I noticed that the surface became pockmarked and rippled, which is how it hardened. I tried a second pour over that, with the same results: smooth and glassy first, then pockmark-y and rippled as it cured. Any thoughts on what I’m doing wrong? Great website, by the way. Wish I found it before I started this project! Thanks!
Hi Tom, polyester casting resin isn’t self-leveling. Can you tell me a little more about the project you are trying to seal? I am happy to make a recommendation.
Thank you for responding so quickly! This is the project: I filled the inside of a small 2.5” square porcelain box lid with resin to make a smooth surface to paint a personalization (for a niece’s upcoming first communion). After applying an initial base layer of resin (about 1/4 in.) and allowing it to cure for 24 hours, I painted on my message in gold paint with a fine calligraphy brush. After allowing that to dry 24 hours, I poured a second thin layer of resin (about 1/8 in.) to cover the text. I’m not worried about the resin shrinking and falling out because the lid has an indentation around all 4 sides, which the resin filled in —I expect that will anchor it inside the lid.
In both the first and second pours, the resin started out as I expected—smooth and glassy—but as it hardened, the surface became pockmarked with ripply little indentations in a more or less regular pattern. (It’s easier to explain in a picture, but I don’t think there is a way for me to upload a photo to illustrate.) I would like the surface to be smooth, and there is room to do another 1/8 in. pour, but I want to be sure I do it right the third time and not end up with this “ripple effect” again. Otherwise I can just leave it as-is, though my perfectionist brain wants it to be glassy smooth and perfect. Any thoughts? I was thinking I might not have stirred the resin and hardener long enough … that seems to be a common error with resin newbies from what I’m seeing online. But that’s just a guess. For the record, I stirred for about 60-90 seconds each time (using 1 oz of resin each time, so it was not much to work with).
I am using resin to coat rocks so they shine as if in water. I placed them on a silicone mat to dry but they stuck a bit. Some sites recommend wax paper but I just can’t see that being correct. I am using Alumilite Resin. Thanks.
Yes, wax paper will work as well.
I would add to place the item curing under a plastic box or glass bowl to keep dust off.
Thanks but I am coating rocks and placing them on a silicone sheet. It tends to stick on wax paper too. Would using cooking spray on the sheet help or would it interfere with the curing process of the resin?
Instead, I would use a mold release. We have several in our store here: https://shop.resinobsession.com/collections/tools-and-supplies/mold-release
I’m brand new and still just gathering information. I’m going to be working with a combination of resin and wood. I’ve been watching a lot of videos and reading tips and tricks. I’m definitely going to be following your blog. Thanks.
I would like to know what to use for MOLDS for a RESIN COASTER.
The instructions are great on everything in this area.
Congratulations for your great work.
Glenda
Hi Glenda, we have a large selection of resin coaster molds here: https://shop.resinobsession.com/collections/molds/coaster
I’m looking for something that will be hard enough when cursed to hold a jacket up. I have made a shelf and want to use old glasses door knobs. The knob I want to attach to the plate. But need something that will harden to hold the two piece together. Do you think this would work?
Hi Connie, if you are looking for resin to serve as a glue, yes it will work for that purpose.
I’ve covered several canvases with resin and have dried drips on he back. What can I use to easily take them off?
You can sand them by hand or use a dremel tool.
Hi there ! I’m super new to this and was wanting to know with the resin can I just use fibreglass resin from Bunnings ? I’m so confused lol
What do you want to make with the resin?
Hi am new to everything am from Kenya n i to try it how can i start it here we have clear vanish can that do
No, unfortunately varnish and resin are not the same.
Should a beginner use uv or epoxy resin? Does it matter?
In my opinion, I think epoxy resin is a better choice. While UV resin doesn’t require mixing, I think it’s fussy to work with.
Where can you buy that little oven (or whatever it is ) what is it and where can you buy it ??😅🙏
I want to do a seascape resin in a picture frame. Do I need to glue the shells To the glass first before applying the resin? Or will they stick to a thin coat of resin then I would apply another clear coat on top?
Hi Sue, you can do it either way. If you want to be sure your shells don’t move at all during the process, you can glue them down first.
Thanks. What kind of glue would you recommend for glass?
I recently got a large silicone mold. When I cleaned the mold the soft rag I was using created tiny but noticable surface scuffs in the shiny area of the mold. This is the first time this has happened to me with a silicone mold and I was just wondering if you have any knowledge of if anything would help this issue. It did affect the resin casting and I’m not sure if polishing the smooth areas would fix it on the resin cast if the mold is unable to be repaired. Thanks so much for your help!
Hi Nola, I’m afraid there is no way to repair the mold. You will need to do some post-demolding finishing to get a shiny finish on your castings.
Why does it have to be between 70-80 steady degrees to mix resin. We live in Texas and I’m anxious to get started
Hi Mary, it’s so the resin cures at the rate you are expecting — not too quickly, but not too slowly (if at all).
So we should wait till when. It never gets cool in Texas lol
Hi Mary, is creating with resin inside a climate-controlled area not an option?
Great tips! I recently just got into resin crafts and I am hooked. You said that you can fix most “boo boos”. I continually get cracks or voids in my pieces when I pour in layers. What is causing this and how can I fix this?
Hi Becky, it sounds like your resin is getting too hot. This article explains more: https://www.resinobsession.com/resin-frequently-asked-questions/epoxy-resin-overheated-resin-is-hot-and-smoking/
Hi, I’m Jhanell. How do u smooth ruff edge on phone case and make it has the glossy look after?
Hi Jhanell, we have an article on how to sand resin here: https://www.resinobsession.com/resin-frequently-asked-questions/how-to-sand-resin-smooth/
I am interested in starting a small business in resin silicone mold creating basic jewelry to where I want to show my creation of art. Although the only question that I can’t figure out is that, does this business type sales sells well to where I’ll be making that extra side income or to where it’s worth your effort to start my small business under and if it is where do I start and know what I need to make the perfect resin jewelry to where people will purchase it?
Hi Pang, I don’t have all the answers for you, but do have some articles here to help you get started: https://www.resinobsession.com/category/resin-jewelry-making-business/
If I use mica powders in my mold, do I still need to use a mold release, or will the powder itself be enough to allow the objects to release easily?
Hi Annie, I use a mold release before applying the mica powders.
Hi there,
I would like to know how to do the wave foam on a tray. I am in south africa and there are loads of resin so have tried a
few. The white does not make a foam when using a heat gun. have used a few drops of white pigment but it still seems
to just make a mess and no foam. any ideas would be fantatsic and thanks for all your tips. It makes a great difference
just to read up.
Thankyou
regards pam
Hi Pam, this article will help: https://www.resinobsession.com/resin-art/how-to-make-ocean-waves-with-resin/
Est ce qu’il faut mettre une couche de résine avant et après avoir mis ses décorations ou seulement après?
Merci