
 You’re excited about making a resin bowl or mandala pendants. Or maybe you’ve got aspirations of making a piece of epoxy art for your living room. What you didn’t count on was calling your resin obscenities like ‘YOU zit-popping puff poodle!’ because things didn’t turn out like the picture in your head. While creating with resin is fun (promise!), it isn’t without a few mistakes and obscenities along the way. Here are the five most common resin troubleshooting problems you’ll run into and what you can do about them.
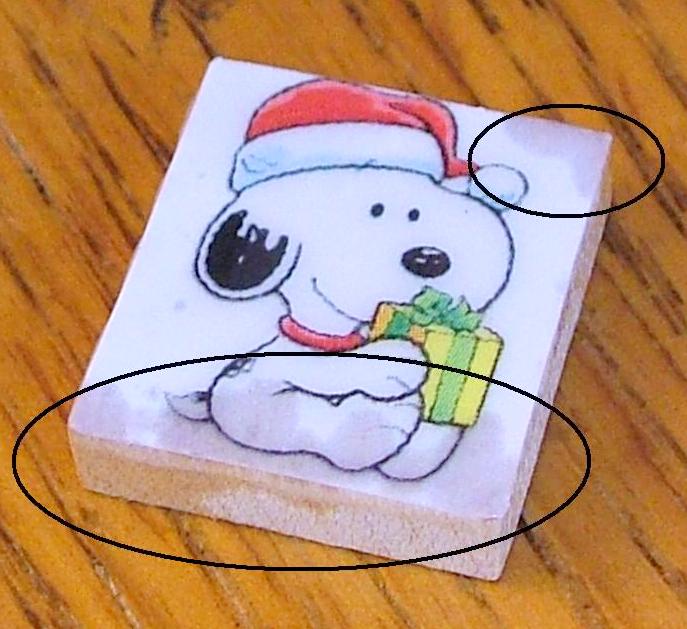
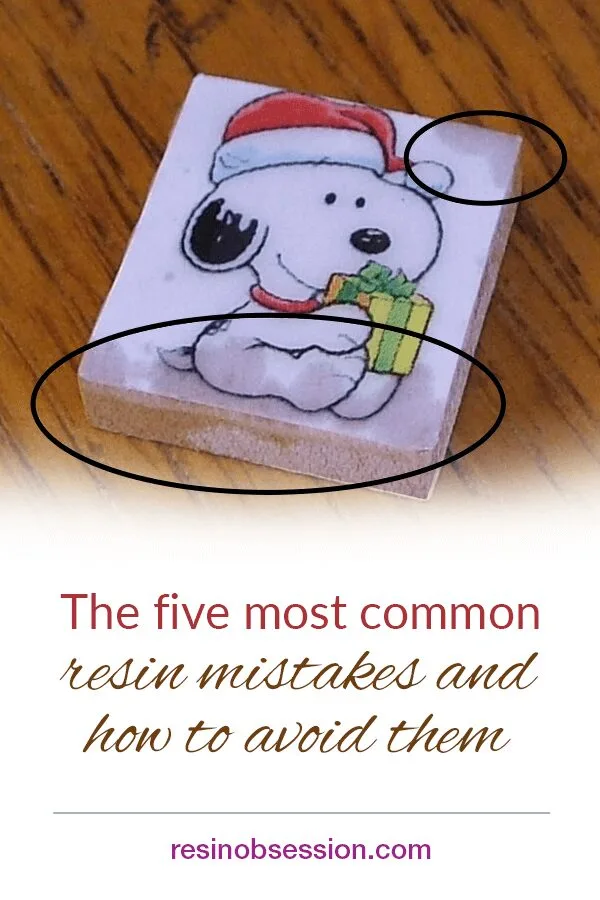
Problem #1: Stains or dark areas on embedded items.
You add papers or porous items into your resin, only to see later that they have stains or dark areas like they’re wet. This happens when the resin soaks into your item.
Anything that looks different when it’s wet needs sealing before including it in resin.
⭐️ BONUS: Here’s how to seal papers and other items before casting in resin.
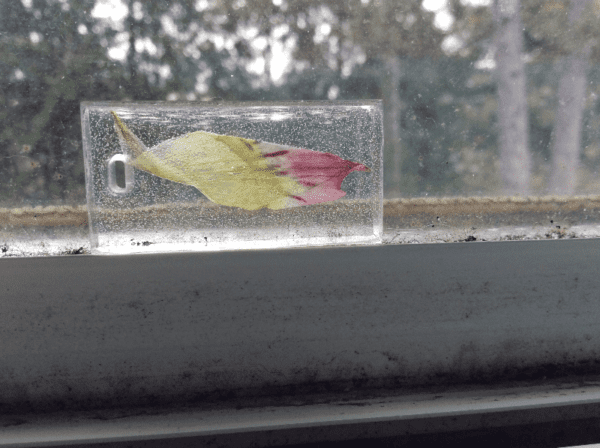
Problem #2: Cured resin is full of tiny bubbles.
Bubbles are the forever nemesis of creating with resin. Like they’re the Wile E Coyote of the resin art world. And much like that crazy coyote, there are a few ways bubbles try to wreck your resin.
The BEST and EASIEST way to avoid bubbles in resin is to choose the right resin for what you want to make.
And how do you do that?
⭐️ BONUS: Here’s how to choose the best epoxy for your project.
Problem #3: Resin cured with sticky spot or not at all.
You use your resin only to find later that you’ve got sticky spots. Or maybe worse — it’s a gooey mess.
The number one reason your resin has sticky spots is that it was undermixed.
This is also the most common resin beginner mistake.
But, if your resin is like saltwater taffy, it didn’t get hot enough to cure.
(and you shouldn’t eat either 🦷)
Here’s what you need to check for in this resin troubleshooting dilemma:
1. Follow label directions precisely.
2. Measure accurately. Use resin mixing cups to measure and mix your resin.
3. Make sure your mixing utensils and containers are dry. Resin hates water.
4. Ensure you’re mixing the minimum amount of resin needed for the curing chemical reaction.
Unfortunately, if your resin is a semi-congealed mess, there isn’t an easy way to save that resin. You can try removing it, but it might have you throwing around the Zit-Popping Puff Poodle insult again.
But, there’s hope for your sticky stuff.
⭐️ BONUS: How to fix sticky resin.
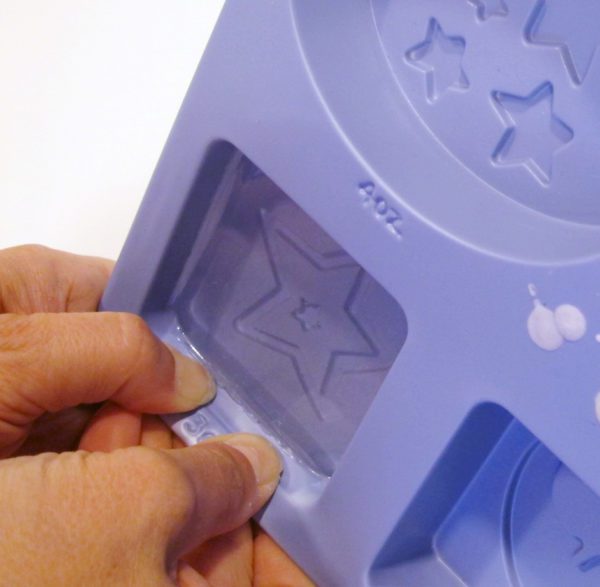
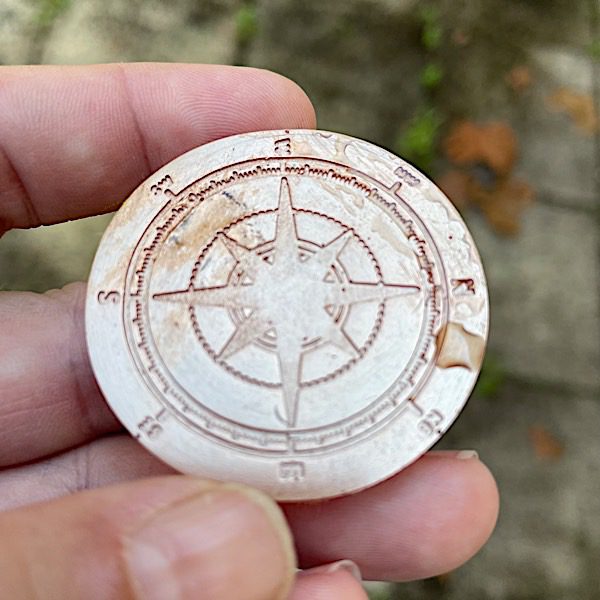
Problem #4: Resin sticks to your mold.
Remember how we talked about your resin getting hot? That heat transfers to resin molds too. And sometimes, it damages the mold.
This is why I always recommend using a mold release — even with silicone molds. Mold release may be the only way you demold your resin in situations like this.
If your cured resin is stuck to a plastic mold, you put the mold in your freezer for 10 to 15 minutes. Then, remove the mold and smack it on a hard countertop. Hopefully, the resin will pop out. Unless it’s a plastic mold that wasn’t meant for resin. If you used something like a soap mold with resin, that thing’s a goner.
If the cured resin is stuck to your silicone mold, the freezer trick might work. But it might not.
Here’s what you should do next:
⭐️ BONUS: 6 hacks to get stuck resin out of your mold.

Problem #5: Resin cures too quickly.
Feeling heat is part of what is normal about resin. But excess heat causes the resin to overheat.
The most common reason this happens is that you mixed too much resin. Resins have a maximum mixing amount. Go above this, and your resin flash cures.
How are you supposed to know what’s the maximum mixing amount for a resin?
⭐️ BONUS: We’ve got that for you in our resin buying guide.
Want to get more besides resin troubleshooting advice?
Get a copy of the downloadable ebook Resin Fundamentals. It covers the resin basics to get you up to pro speed in no time. Buy now and get an email download link for the PDF book in minutes.
Unpublished Blog Posts of Resin Obsession, LLC © 2023 Resin Obsession, LLC
Wonderful info!
Hello I was wondering how to remove dried resin from a hard non flexible mold?
@Hope,
Did you try putting it in the freezer?
Is there someplace to find information on proper care and cleaning procedures of utensils and mixing containers?
@Gizem, Wipe your containers and stir utensils while they are still wet with a paper towel and acetone. (Be sure to wear gloves when doing this.) If they have dried already, try soaking them with a very hot water and Tide laundry detergent.
@Katherine, great tutorial as always!!
I realize this is a tutorial for trouble shooting, but the snoopy is a perfect example of how to salvage a piece you might otherwise throw away…
No need to through out most resin pieces that didn’t quit turn out. With a little creativity you can salvage most pieces.
The scene is a winter/Christmas scene. The seepage is at the bottom & a bit at the top…
Add a bit of fake snow mixed with a tad of white glitter & glue on to the bottom to cover the bottom error. Add glitter or a small bow to the top error. Let all of that dry overnight and in the morning pour a doming layer. Tada… problem solved.
For spot seepage due to the resin leaking into the paper, do the spots get bigger over time?
@Melle13, no the spots should not get any bigger.
Can the shape of the mold cause it to hear up more and not cute correctly?
For example: I mixed a batch of resin and poured half into a flat round mold and the other half into a deep square mold. So I’m using the same resin for both molds, but the square one is very hot and the corners of the the resin have shrunk down, (never seen this before before).
I use the circle mold all the time for coasters, thought I would try the square for paper weights, but not if this happens. I just poured and inked so I don’t know how it will fully cute, but the coaster looks fine.
Yes, that can happen. Deep, narrow molds concentrate the heat, making the resin heat up more quickly.
What happens when you spray polyurethane over a resin coated painting? What reactions can occur?
@Racquel, I’ve never done that. I don’t know what to tell you to expect.
hi ,the resin that i use is 100:30 ratio so recently i did two sets but both didnt cur properly i used a butter knife to scoop the resin out from the molds and its cured half way and still rubbery do u think it’ll cure in time to come its been three days now , …
@Amali, if the expected cure time has passed and your pieces are rubbery, giving them more time isn’t going to help.
Will the exposed resin at the top of the mold harden or will it remain tacky – and in that case what can I do to seal and harden the top of the mold.
@John, unless you are using a polyester resin, it will cure at the top of the mold
Thanks – I turn pen blanks and some of them come with a tacky surface which turns away with finishing the blank and I guess those are not acrylic
Thanks.
FYI – I intend to encapsulate butterfly wings in resin – thin sheet – soften the cast and wrap it around a pen tube. The next step is to encapsulate the entire tube butterfly wing wrap and all in clear resin mold (rectangle), harden, turn on a lathe, and voila.
This is going to sound crazy but I am in serious need of help. I have been working on a large piece but have never used resin before. I am familiar with silicone, and assumed it would be a similar process. Instead of doing a test, as the manufacturer recommended I jumped straight into the large piece, miscalculated the amount of hardener for the first batch which leaked out of the 2m long wooden container onto my studio floor. The space has terrible ventilation and the fumes are intoxicating. In a completely misguided attempt to conceal the fumes I layered wet clay on top of the wet resin, which has obviously made my problems worse. I have now tried to scrape the clay off the floor and have poured the remaining hardener, a significant amount, onto the floor in an attempt to get rid of the fumes, and for some unfortunate reason I poured a considerable amount of water into the mix. Having read the comments on this site I now realize what a foolish decision that was. I’m not sure exactly what type of resin I have been using but since it was for a large table I would assume it is a polyester resin as it dries very hard with a slightly tacky surface. I have tried cleaning the wet resin with acetone but that does not seem to help, especially with the fumes and my throat is now raw from inhaling the fumes. Is there any advice you can give me that can help me clean/dry the resin to eliminate the fumes? I would prefer not to use any more toxic chemicals but would appreciate any suggestions.
Hi Megan, assuming you are using a polyester resin, those fumes can last a long time. You need to completely open up your studio and get as many fans as possible to get the fumes out of there. The only way I can see getting the mess out/off of the floor is for someone (like a contractor) to sand it down. That is going to require that person to wear the appropriate protective gear in addition to properly disposing of the waste. With any luck, you may be able to use a crowbar (or something similar) and a mallet to dry to break up the resin. (It’s the technique you would use trying to get tiles off a floor.)
I was wondering if there was an easy way to remove metal charms from resin cabochons that you screw up? Sometimes my resin doesn’t set properly and I’d hate to waste the charms I’ve dropped in the resin. Any help would be much appreciated.
If the resin is completely cured, I’m afraid you are out of luck. If it is still syrup-y, you can try soaking in acetone.
Hi,
I got confuse about this;
Make sure you mix the minimum amount of resin needed for the chemical reaction of curing to occur. For example, if you’re working with a 1:1 resin to hardener resin kit, you cannot mix two drops of resin to two drops of hardener and expect it to cure. Resin curing is a chemical reaction that requires a minimum amount of each component for it to occur.
How this can be if the ratio is 1:1, I cannot measu equally ???
Also, instead of leaving the resin in warm water, it not should be better if I warm it up in the micro wave for few seconds?
Thanks a lot
Osmar
Hi Osmar, mixing together two drops of resin and two drops of hardener are unlikely to produce enough heat to allow curing. You will need to ask the manufacturer the minimum amount of each, i.e. 5 ml of each for example, that you will need to mix in order for curing to occur. I would not warm up the resin in the microwave as that may get it too hot in spots.
Hi I’m in trouble! I need your help! I am making cubical crystal clear resin awards. But before I take the piece out omg the mold the resin crashes inside. It brokes when it is still hot, I don’t know what Am I doing wrong 🙁
It sounds like the resin is getting too hot. Are you mixing no more at once than the manufacturer recommends?
yes, actually I reduce the amount of the catalyst. But I get the same problem.
do not worry! When resin heats up it will cure faster but still give it a day to fully cure. It wont effect the outcome it will just get very hot but once it cures it will start cooling down.
I wouldn’t say that quick heating doesn’t affect the final outcome. Sometimes these pieces can crack or get a ton of microbubbles that will make the final casting cloudy.
I am trying to pour resin in a small glass bowl with a rose into to make a paper weight I have dried flowers but the minute the resin starts to set up the flower turns brown help
Hi Jerry, it sounds like you haven’t sealed the flower. We have a section on our blog that should help you with instructions on how to dry and seal flowers for resin: https://www.resinobsession.com/tag/drying-flowers
I read somewhere about sealing flowers, plants, or candy with something, but i can’t remember exactly where I saw it
HI
Just a question – do all mouldy need to be plastic or silicone or is it possible to use aluminium mounds e.g. Old fashioned jelly moulds?
Thanks
I have not tried them for resin molds. Resin likes to stick to metal, so you would definitely need to use a good mold release. Even then, I question whether or not the mold is flexible enough to release resin.
I need help recently started pu resin on the paintings but as it dries valleys appear where resin has separated I try to push more resin back on to those areas but doesn’t help , what am I doing wrong?
Are you using a doming resin?
The resin doesn’t adhere very well on the edges (the rounded part) it looks like fish eyes the way resin works with silicone but I clean my edges just like the front. Suggestions?
What kind/brand of resin are you using?
I’ve used Marine epoxy, Countertop (I Dont remember the brands) and as of late Art Resin. I get the same average with all of them.
So the good news is that you are using doming resins, which should work. Unfortunately though, it sounds like your edges are a little too curved for the resin to want to stay. Have you tried creating a tape dam around your edges to help keep the resin in when you pour?
Yes I have. I wondered about taping on the bottom but out straight like a tray.
I have never been able to stir my resin and not get air bubbles in it. How do you do that? I do the same thing you do in the video.
Try stirring slower.
I have some glassine paper stuck to my resin painting. Any idea how to remove it please?
Ok I know this is trouble shooting resin but I need a more experienced view. I took some resin pieces that I was going to throw away to school. People really liked them and I got commissions. I got into resin a month or two ago and most of my pieces turn out pretty good, save for the occasional tackiness and bubbles. I’m not trying to market them as professional quality and I tell people this but I’m worried that I might be getting over my head. I don’t know if I should do the commissions and stop or try to get more. Do you have an opinion?
I think as long as you are up front with the recipients, I think that’s fair.
Thanks for all your tips. I’m new to resin but I noticed on my 2 resin pieces, canvas and wood panel that they both end up with less resin on all edges. I leveled them and I’m puzzled why this is happening? Tks
Are you sure you used enough resin to cover the area? This article details how much resin to use: https://www.resinobsession.com/resin-frequently-asked-questions/how-much-resin-do-i-need/
Thank you Katherine for all the great info. For 12×12 I used 5oz for top n sides. Should I re-do and extend painters tape up n above edges to hold resin in? I love the all over look though but willing to giv it up.
PS I hav a tip I wld like to share. Vaseline works great where u don’t want resin. It peels right off. I used it on my underside edge of my wood panel b4 I resined.
Im using Smooth Cast 305, i measured everything right but it hasnt cured properly and is soft and there is some excess oils. Ive taken my casts out of the molds but there is some oils and rough bits of resin left behind. Whats the best way to clean the molds out?
A good detergent and water.
Hi, please could I ask for some help. Many years ago I poured resin (over paper pictures) on the bottom of a tray. I have now found out that the painting under the resin and paper was done by my grandmother. I want to know if there is any way of now removing this resin, after all this time, without destroying the painting underneath. Thanks.
Unfortunately I don’t know of a way of removing the resin where the painting won’t be damaged as well.
Is there anything I could try though? (obviously with no guarantees, but just to try?
We got some furniture resin hardener on a couch….how can I clean the couch?
I’m afraid there is no way to get it out of fabric.
I am casting in a silicone mold. The top part comes out crystal clear but the bottoms and sides are dull. Any idea why? I am using a mold release and made sure it was completely dry before I poured.
Thanks!
Hi Tina, this video on our youtube channel may explain why this happened: https://youtu.be/9wQIp4_mIRM
Hi I have done an acrylic pour painting on a stretched canvas. I used silicone in some of the paint. I used the product Glaze Coat High Gloss Craft Resin. I mixed 1:1, stirred for 6 minutes and all of that.
The result I got is blocky. It resembles what happens if you were to spill Sprite or 7-up on a table and let it dry. The surface is smooth to the touch and not tacky. It just looks like a Sprite spill… any advice?
Hi Kayla, it sounds like you have some divots in your surface. Do I understand that correctly?
I am attaching a pic as I am not sure what it’s called when this happens.
[IMG]http://i64.tinypic.com/290s9z7.png[/IMG]
Hi Kayla, it looks like ‘fish eyes’. Did you wash your painting surface before applying resin? Silicone leaves behind a residue that can push away resin.
I was not aware of that step. How does one wash a painting?
Use a good detergent (I like Dawn dish soap) and allow to throughly dry. Some will go the extra step of rubbing down with alcohol to remove any remaining residue. Allow to fully dry before applying more resin.
Awesome, thank you. Not as easy as it sounded. But, Thank You.
I’m trying to set a piece of fruit in a resin block, but the temperature of the resin burns the fruit as it set, leaving a black burnt mess inside. Can you help?
Hi Brian, I want to help you with your project, and I think this situation is best suited for a one-on-one consulting call where you and I talk back and forth about what’s going on. I can set you up for a 15 minute consultation call. If you want to send an email through our contact page, I am happy to respond with prices and availability.
Hello ~
I just had a question regarding a problem I’ve encountered trying to use EnviroTex Lite Pour-On Resin.. (I have a photo to illustrate my issue, but I am unable to attach a photo to this message). Basically my issue is that when the product dries, it will ‘retract’ in certain areas and not dry smooth… (I call it the “Freddy Krueger effect”). Please note that I am also pouring on top of an already resin surface, (in an attempt to ‘restore’ or cover blemishes), but I have sanded the surface prior to use (1000 grit). I will also use a propane torch to eliminate the tiny air bubbles.. yet somehow, I am unable to successfully get it to cure smoothly. Any advice/tips as to why this may be occurring or what I may be doing wrong is greatly appreciated!
Thank you!
Hi Eric, it sounds like you are experiencing ‘fish eyes’. It most commonly occurs when you don’t use enough resin or if your surface is oily. There is a calculator at this link that tells you how much resin you should use:
https://www.resinobsession.com/resin-calculator/
Why does my Resin crosses get bendy?
Great question Amy! I talked about it recently in this article: https://www.resinobsession.com/resin-frequently-asked-questions/why-is-my-resin-bendy/
Hi Katherine,
Great article, thanks!
I’m preserving dry flowers in resin using spherical molds and my first batch was awesome. However the second batch became a goopy mess inside the sphere, like I can press the ball on the surface and feel the softness inside.
I think I might have not mixed enough (3 minutes according to the instructions) or the temperature might have decreased because I live in a warm country and I turned on the AC in the middle of my process.
I have a question regarding resin curing. When I pour the resin on many tiny flowers, they rise to the top and I continuously poke them so they stay inside. Does that mess with the resin curing? Could this be a reason why my resin was goopy? Plus if I fill the resin mold in 2 parts to solve this issue, meaning I fill half the mold with resin and flowers and let it dry, then I mix more resin and pour it on the top, will it be a problem for curing resin?
Thank you very much,
Tooba.
Hi Tooba, it sounds like you are working hard to get your resin and flowers to work together. Awesome! I want to help you with your project, and I think this situation is best suited for a one-on-one consulting call where you and I talk back and forth about what’s going on. A 15-minute consultation call is $20. I do them by video so I can have a chance to see what you are working on.
If you are interested, please send a message through the ‘contact us’ page and I can get this going for you. Best, Katherine
I really appreciate your video on using paper with resin!!! I’m getting ready to do a pour using a small amount of paper, and found your video very helpful as I only have 1 picture to use and don’t want to mess it up. Thanks again 👍
You are welcome. Good luck with your project!
Hello,
I am pouring 1/8” layers of resin over dried flowers in a mold. This last pour dried with a leather look. I wait 24 hours between pours. I just want to make sure my last pour will dry like glass. Any suggestions? Thank you, Joyce
Hi Joyce, it’s hard to say. What kind/brand of resin are you using?
Liquid Diamonds, thank you!
Hi Joyce, I’m afraid I don’t have any experience with that brand and don’t know if a new layer would look better or not. Since you are using a mold, a casting resin is a better choice. We have several in our store here: https://shop.resinobsession.com/collections/resin/casting
I resigned to of my Pebeo tile creations using Pebeo brand resin glaze and missed a few spots. Can I reapply resin and does it need to be the same brand? Does it need days if curing? Just did it yesterday. I don’t have any resin left.
Hi Teresa, yes, you can reapply another layer of resin. While I haven’t used Pebeo resin, I have never had a problem applying one brand of epoxy resin over another brand. You can apply another layer right away or wait until the first layer completely cures. If you wait until it cures, be sure the surface is clean before applying a new layer.
If a section of my painting repelled the resin can I go over that section if I wash it first
Hi Christine, yes, you should be able to, but you need to know why the resin repelled first. This article details five reasons why that happens: https://www.resinobsession.com/resin-art/why-are-there-dents-and-holes-in-my-resin-painting/
I’m pretty sure I did not adequately clean my surface. I am going to let the project cure then wash dry clean with a small amount of alcohol and recoat
Hi. I recently used a resin release bottle and in 24 hours my mold never completely dried. It’s losing resin as I test it out. It’s not in the form anymore. Is there anything I can do to harden it quicker?
Hi Rose, I’m sorry this is happening to you. This article may help: https://www.resinobsession.com/resin-frequently-asked-questions/what-is-the-fastest-way-to-cure-epoxy-resin-speed-up-resin-curing/
What should I do!!!
I was using a silicone mold, perfect 1:1 ratio & I thought the design was 100% cure and dry and when i took it out the mold, it was Dry but I was still able to bend it. Is the design ruined or can i continue to let it sit and it’ll harden up?
Hi Whitney, I’m sorry to hear your resin is bendy. This article will help: https://www.resinobsession.com/resin-frequently-asked-questions/why-is-my-resin-bendy/
Hi . Ive just started out with resin and have had a couple turn out ok and some not . I hqve tried a different couple resins And just not having much luck im weighing the resin out like suggested and mixing for 3/4 mins . Problem i have is i have so very gloopy resin in mould that have been there for almost 24 hrs there so sticky they don’t pull away from the sides … my question in will i be able to remove and clean my moulds or will they have to be chuckled?
Hi Jo, I’m sorry this is happening to you. You can try putting them in a freezer for 10 minutes. Perhaps they will freeze hard enough that you can demold.
Hi Katherine, I’ve just had my first disaster with Resin. My “studio” room has been around 64-68 degrees F, I have a fan heater and a thermometer at my table and try to keep the area at least 72 F. I have a water bath and heat the resin up to 26-27 degrees C, which at most is 80.6 F, and is only the bottom of the bottles. By the time I had pulled the bottles out, dried them off, and started to pour them, they didn’t seem warm to the touch. I mixed them in my usual OCD measuring and mixing style, and then was dribbling clear resin on a cab for a third pour and my hand holding the resin got hot. All of the sudden I had a gloopy off white solid in the cup and the cab I was sealing was developing a layer of white. I cleaned up the area, and started another pour. (No I did not put the bottles back into the water bath , , ,) This time the reaction was faster, and the clear liquid I had poured into a 30 ml cup with black ink drops was no longer liquid. Neither was the new gloopy off white solid in the big cup. I can’t believe that there was too much heat, nothing cracked. Any ideas? Bad batch of resin and hardener? This didn’t happen last week, the bottles I used today were new & unopened.
Hi Vicki, how weird! It definitely sounds like something sped up the reaction. Maybe try again without warming the bottles first.
AHA! My subconscious supplied the answer overnight. I had one box of Alumilite Casting Resin, and I bet when I get to my workroom I’ll find that I opened it by mistake. I thought A & B were not as viscous as they usually are . . . LOL.
Oh goodness. That’s an easy fix!
Hi there, I’m a newby and have made eight wooden coasters as a gift. I inset copper and silver coins into them from our pre decimal days, placed paua shell around the edges and finished them with a coating of dome epoxy. They turned out lovely except I made one late mistake by inadvertently touching the top on two of them and leaving a couple of finger prints. Will they disappear if I just pour another coat on them or could I perhaps smooth them out with a touch of isopropyl alcohol?
Hi Rick, recoating with another layer of resin will work. This is the one I would use: https://shop.resinobsession.com/collections/resin/products/resin-obsession-crystal-doming-epoxy-resin-jewelry-grade
Katharine, Our Museum owns 3/4s of a beer mug from 1869 Eldorado, Oregon. My plan is to make the missing glass parts out of wax, assemble into a round top and make a mold, matching the wax cut lines to the break in the glass. I then hope to get a clear epoxy resin and pour into that mold and when set, glue to mug. I’ll use a similar procedure for the missing handle (using photos of old mugs for shape) and glue it to the mug. This will then be put on display. Any thoughts?
Hi Gary, this sounds like a great approach!
Hi! I made a resin mold over wedding flowers and began sanding it down to find that a few layers didn’t dry properly. The gooey resin clogs up the sand paper and I’m not sure how to make it look clean again. Any tips on how to make the resin hard or get it to come off easily?
Hi Emily, I’m sorry this happened to you. This article explains how to fix sticky resin: https://www.resinobsession.com/resin-frequently-asked-questions/how-to-fix-sticky-resin/
I am trying to make small snowflakes from a candy mold. The shapes themselves come out great. The issue is that the surface of the resin that touches the mold itself is dull. The surface that is exposed to air, is beautiful and shiny. It is the mold itself that is causing the dull color? Do I need a different mold?
Hi Danielle, it sounds like the mold you are using has a dull surface and that’s why your snowflakes are dull. You can buy a shiny surface snowflake mold in our store here: https://shop.resinobsession.com/collections/new/products/snowflake-charms-silicone-resin-mold-make-resin-snowflakes
Thank you! Do you happen to have any that don’t have a loop at the top?
We have this snowflake mold in our store here: https://shop.resinobsession.com/products/snowflake-silicone-mold
Hi quick question I was hoping someone could help me resolve. My molds have marks on them from cleaning, they are just smudges so to say on the surface of the mold. they are transferring to every product I make from the mold. I have tried alcohol to no avail, also dawn. is this something a mold release could solve? or is there any other way to get the marks off?
Hi Bailey, unfortunately, it sounds like your mold is damaged.
Hi I have a question! Once my resin has cured, after a while I start to see round circles forming on the top of the resin creating a weird bubbly pattern. The resin itself is clear, it’s just the top layer. I have tried changing the humidity or my room, warming my resin before mixing and mixing for over 5 minutes but these circles still form after about a week. Do you have an suggestions, I would really appreciate it!
Hi Kaya, that’s kinda weird. It sounds like something is causing your resin to heat and distort.
Hello. I was given a molded resin “board” as a gift. I realized that there are a few sticky areas on it. I was told by someone that I could rub the sticky areas with a light oil and then wipe but it didn’t help. I don’t do resin art but I do painting and poured painting and have a gloss sealer that I spray on my poured paintings and get a great gloss finish with it. Could I use the spray sealer over the board to alleviate/cover the sticky areas? Thanks for any help you can give.
Hi Ivetta, yes, that should take care of the sticky spots.
Hi I been turning resin bowls mixed with wood and my resin has been breaking off in small pieces I must be doing something wrong
Hi Raymond, what resin are you using?
I have a clay ornament that is not flat its curved on on sides. when I did my resin it of course looks like a pool in the middle. how do I fix this? I used art resin brand idk if that matters but just in case. lol. thanks for your time
Hi Kelly, unfortunately, resin pools when it is put on a curved surface. If you want it to coat evenly, you have to keep it moving while it’s a liquid. This tutorial about making an epoxy tumbler shows an idea on how to make that happen: https://www.resinobsession.com/resin-tutorials/how-to-make-epoxy-tumbler/