
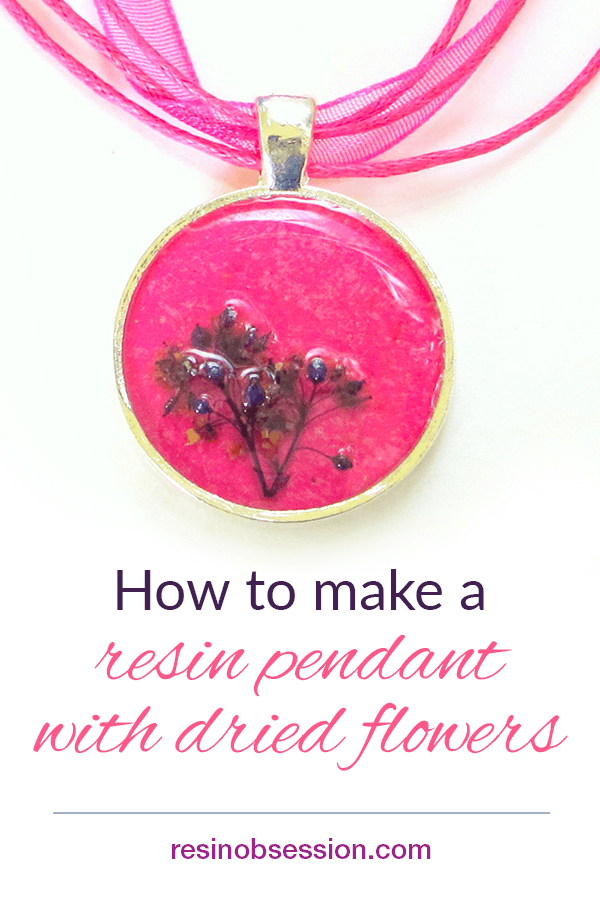
Learning how to use flowers in resin is the ultimate project. It’s such a classic look, not to mention a great way to preserve flowers for eternity. You can use wedding flowers or maybe even ones you dry from your garden. You’re going to love the final result.
Resin supply list:
- Resin Obsession crystal doming resin
- 1-ounce reusable mixing cups
- Stirring sticks
- Safety gloves
- 1-inch round bezel pendant
- Mod Podge glue
- Dried flowers
- Scrapbooking paper
- Non-stick surface to protect your work area
OPTIONAL:
- Polycrylic spray
- 1-inch round paper punch
- Drying mat
Step 1: Dry your flowers
If your flowers aren’t dry, you’ll need to do this first. This can take a few minutes to a few days depending on what technique you use.
Here are a couple of options:
Drying flowers in a microwave
Drying flowers in sand desiccant
💡 Pro tip: Your flowers will be delicate after drying. This is a great time to use the spray to stiffen them up. It also helps the flowers keep their shape better when adding them to your epoxy resin.
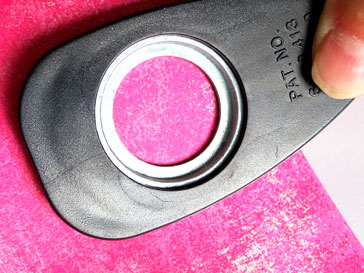
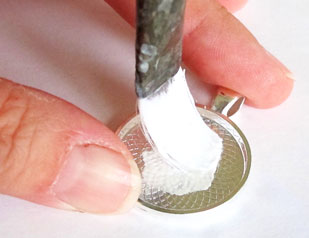
Step 2: Prep your paper
Use scissors or a 1-inch paper punch to select your circle for the bezel. Then, punch out the circle shape.
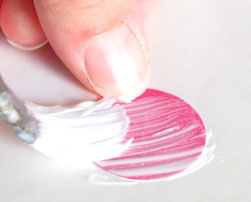
Place your paper cutout on a sheet of wax paper. Next, brush a layer of glue onto one side. Allow this layer to dry for 30 to 45 minutes. Then, peel it away and glue the other side. Allow to thoroughly dry.
⭐️ BONUS: If you’ve never done this before, learn more about how to seal papers for resin.
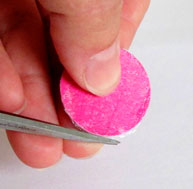
After both layers of glue are dry, peel the paper away from your wax paper. Trim the excess adhesive away with scissors. Trim close to the edge, but not exactly on the edge. If you trim too much glue away, you will expose the paper’s edge, allowing the resin to seep in and stain the paper.
Step 3: Add the paper to your bezel.
Apply a layer of glue to the bottom of your bezel.
Then, press your paper in and make sure it fits snugly. Apply another layer of glue and allow it to completely dry.
Step 4: Add resin
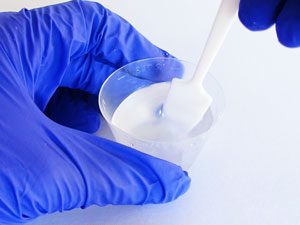
Measure and mix the crystal doming resin. It’s the best epoxy for this jewelry project because it creates a high, glossy dome. Plus, the resin helps magnify your flowers.
⭐️ BONUS: If you’ve never mixed epoxy, you’ll want to review these resin mixing instructions.
Spoon mixed resin into the bottom of the jewelry blank. Then, use your stick to spread it across the entire area.
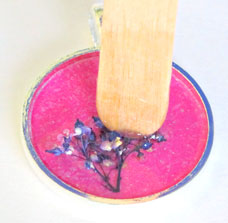
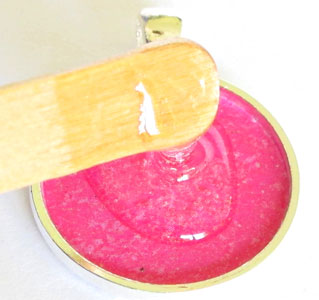
Step 5: Add your flowers
Place the flowers in the bezel. Use your stick to push them into your desired spot.
Because these flowers weren’t dried flat, they stick out of the resin a little bit. It adds a fun 3-D effect.
💡 Pro tip: I love using a Resin Obsession drying mat when I’m working with resin in bezels. Why? See how the bail at the top is not flat like the back of the pendant? When resting on a flat surface, this makes the pendant pitch forward, and the resin won’t dome evenly. When you put the bezel on a mat and let the bail rest in one of the open holes, it lets the bezel lie flat.
Go over the surface of your resin with a heat gun to remove bubbles.
💡 Pro tip: Bubbles like to hang onto flowers, so check these areas closely.
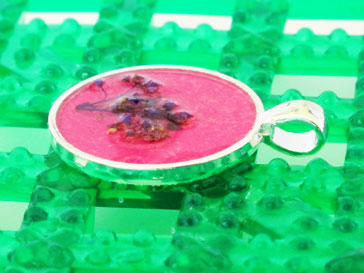
Cover with a dome and allow to cure. Depending on your resin, it will cure in 24 to 72 hours.
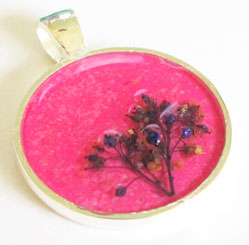
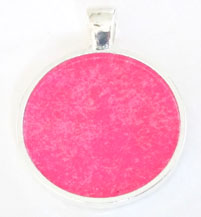
Enjoy your new pendant!
Want to learn more about using flowers to make resin jewelry?
Get a copy of Resin Jewelry Making and get more projects you can make this weekend. Buy the book now, and it’s yours to read in minutes.
Unpublished Blog Posts of Resin Obsession, LLC © 2023 Resin Obsession, LLC
This is very pretty and looks easy to make. It’s on my next “to do” list!
Thank you Katherin
My dried flowers lost all color, bleached white after i sprayed them. How can I lock in the color ?
Another good reason for having the non-stick drying mat. My next purchase! Thanks for the tutorial.
@Yodamom,
I don’t have a good answer for that. I used flowers that were already dried and colored. (purchased from local craft store) I somehow have this idea in my head that there is a spray preservative you can get from a florist to help preserve flowers?
Hi Kathy,
I want to make a round ball pendant with flower about 9-10mm.Can you recommend a mold to use. Thank you.
@Linda,
We don’t have a mold that size. Your best bet is to make one from silicone.
Katherine,
This is just lovely. I do have a question though. Can you use another type of sealer or does it have to specifically be a resin sealer.
Thank you
@Michaelene,
I don’t know that is necessarily has to be a ‘resin sealer’, but I would make sure it’s something that dries clear.
I have been trying to make jewellery with dried daisies but the yellow centre keeps seeping out and dying the white petals yellow 🙁 I have tried all sorts of sealers! Do you have any tips??
@Linda,
What sealants have you tried?
I have used pva glue, modge podge and Pastikote which is a clear sealer that I use on a lot of my resin pieces… with no joy as yet! As soon as it hits the resin the white petals start to turn yellow! L 🙂
Need this how to get
Try curing the parts separately. I like this stuff called diamond glaze, or midge podge should work, but coat just the yellow of the flower first. After it hardens and it coated well coat the petals. This will prevent bleeding
Hi Katherine,
I am a beginner who is interested in making resin rings and other jewelry pieces out of dried flowers from funeral, wedding, etc. bouquets to sell. Which resin is best to use for that?
Hi Shelly, the Resin Obsession super clear resin will work great for something like this. You can find it in several sizes in our shop here: https://shop.resinobsession.com/collections/resin/resin-obsession
Thanks!
I live in Canada so I was wondering how much the shipping is and if there is any additional charges, taxes, or duties when it crosses the border?
Great questions! All the answers are in this article: https://resinobsession.com/shipping-policy/
Must the flowers be dried? Can fresh flowers or leaves (green or fall-colored) be used? How would you prep them?
Which resin would you recommend if you wanted to make hard, clear cubes/domes/globes to be used as paper weights or sun catchers?
Yes, the flowers must be dried. Fresh flowers will rot in resin.
.
For casting clear cubes, domes and globes, the Resin Obsession super clear resin will work great for this. You can find it in several sizes here: https://shop.resinobsession.com/collections/resin/resin-obsession
Where can I find a mold for a fat dew drop, and a tall drinking glass?
When you say, “Spray lightly with the acrylic spray” in step 1, do you mean the resin gloss sealer spray?
Yes Marianne, that is what I mean.
Newbie here, thinking of trying this with my 10 year old daughter.
How would you go about doing this with pendant bezel that does not have a back, but just the outer ring? We want the pendant to be see-through.
Thanks much! Love you site!
Hi Tori, this article will help: https://resinobsession.com/resin-tutorials/how-to-use-resin-in-open-bezels/
I use uv resin and have tried a lighter torch to remove bubbles, but it doesn’t seem to help. What am I doing wrong?
Thanks for all of the info, it’s great.
Thanks for all of the info. Do you have an answer as to why a small torch won’t rid my resin of bubbles?
I don’t Peggy. Have you read this article for other things to try: https://resinobsession.com/resin-frequently-asked-questions/resin-bubbles/