
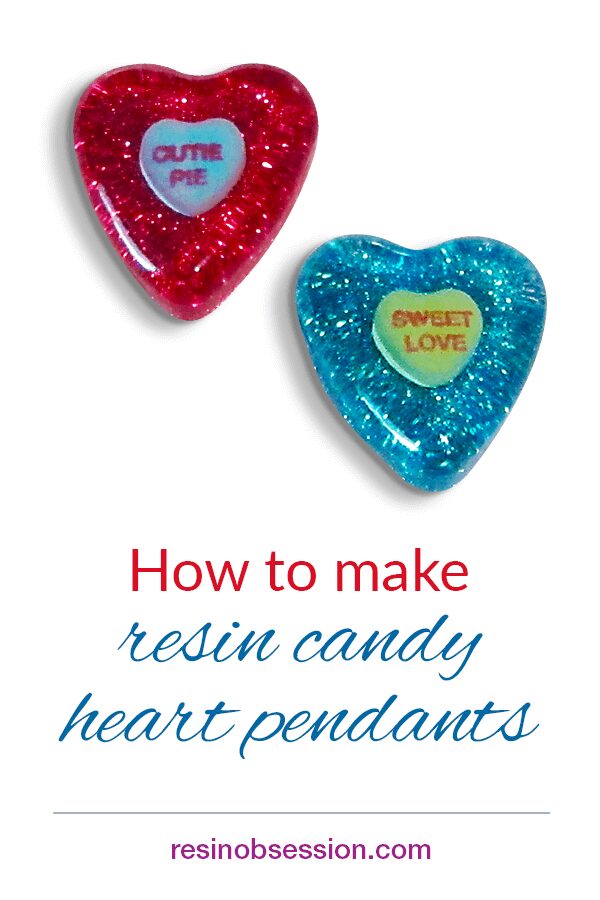
Is anyone else like me and finds those candy hearts a little too chalky to really be considered candy? I’ll take chocolate any day over those crumbly, ‘not sure what flavor this’ is candy heart. But I totally get sucked in by the sayings. So what do I do with them if I don’t eat them? I pick my favorite conversation heart, then turn it into jewelry with resin. And you can do it too. Here’s how you can use them to make a Valentine’s Day candy heart pendant.
Step 1: Get a jewelry mold
You might think you have to use a heart mold since this is a Valentine’s Day project. Ah, not so. The heart is what makes it Valentine’s Day themed, so pick a shape you like. (If it’s a heart, then so be it.)
Here’s a good resin pendant mold since it’s deep enough to hold the entire candy heart.
Step 2: Prep the mold with mold release
Once your resin cures, you want your resin pendant to pop out easily. Using a mold release ensures that happens. Plus, it prolongs your mold life.
Step 3: Seal the candies
Since conversation heart candies change colors when touching resin, you want to seal them first with a couple of light layers of clear-drying acrylic spray before using them to make jewelry.
And by the way, the color change can happen months after making these candy heart pendants. You can see how some of mine turned brown.
Let the candies dry for 24 hours before using them in the resin.
Step 4: Mix resin
Since you’re using a mold to make the conversation heart jewelry, it’s critical you use an epoxy resin meant for molds. The Resin Obsession super clear resin is a perfect choice. It cures hard and bubble-free in 12 hours or less. Plus, it doesn’t go soft when you wear it like other resins can.
Mix enough jewelry resin to fill the bottom half of the heart mold cavities for these pendants. Leave this resin clear. Pour the resin into the mold cavities, then add the candies, writing side down.
At this point, you have two choices to finish your conversation heart jewelry pendants:
Finish filling the mold cavities with more clear resin.
Then, add glitter once the resin is sticky but not fully cured. This is also called a resin’s gel time and happens about 45 minutes after mixing if you’re using the super clear resin.
OR, leave room for a second layer of colored resin.
Let the resin cure, then mix a new batch of epoxy, but using resin colors this time. Finish filling the mold cavities.
Step 5: Demold the resin
Once the resin cures, peel them out of the silicone mold cavities. If you’ve got sharp edges, sand the resin with a nail file or sandpaper.
Step 6: Add findings
There are multiple jewelry finding options for resin, but I think the easiest way to make these charms wearable is to glue-on bails with E6000. Let them sit for 24 hours before wearing them.
Want more help on how to make conversation heart jewelry? This video shares all the details:
Ready to tackle resin jewelry making but worried about making mistakes?
It’s why I wrote the ebook Resin Jewelry Making. You’ll get a clear path to follow to go from confused to confident when creating with resin. It’s the book I wish I had when I started making resin jewelry over seventeen years ago. Buy the PDF book now and get a download link in minutes.
Unpublished Blog Posts of Resin Obsession, LLC © 2022 Resin Obsession, LLC
Thank you for a great tutorial.
I have three questions.
Can you use modge podge on the candy to seal it before putting it into the resin?
Is it possible to spray an acrylic clear coat on the outside of the finished pendant?
Do you ever use a dremel to sand off unwanted dried resin?
Elizabeth, here are my comments on your question above:
1. Yes, Mod Podge would seal it, although I would test it on a couple not so perfect hearts first. I’m worried the inked on saying may run or smudge once it gets a little glue on it.
2. Yes, an acrylic clear coat on the finished pendant will shine it up nicely.
3. Yes, you can use a dremel tool to take off extra resin, but it will take it off fast! I generally use sandpaper to take off a bit here and there. (When using your dremel, don’t forget to use safety glasses and a dust mask.)
Hi
I cannot bring up the video is there another link?
Thanks
Kathyrn
Hi Kathryn,
Here is a link to the video on youtube: https://www.resinobsession.com/Resin-Resin-Resin/109/How-to-make-resin-jewelry.html