
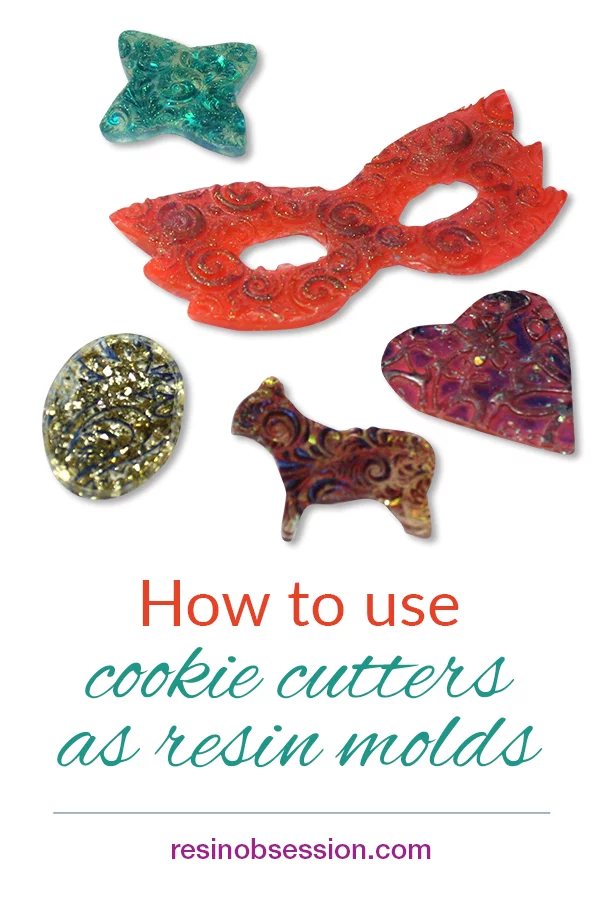
 Have you ever picked up cookie cutters and thought they would make excellent resin mold shapes? Let me assure you that you can. I’m going to teach you how to use cookie cutters as resin molds.

Step 1: Gather cookie cutters
As odd as it may seem, metal is the best cookie-cutter base for this technique. Cookie cutters with simple shapes are easier to use.
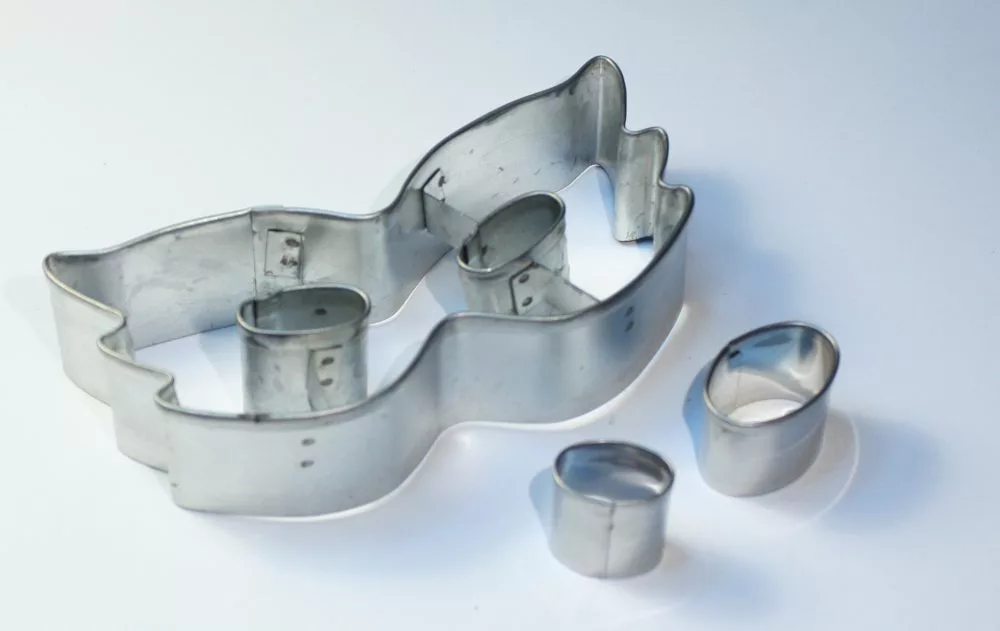
While you can use cookie cutters with small openings and other intricate shapes, they can be difficult to seal and demold.
⚠️ IMPORTANT: If you use a cookie cutter with casting resin, never use it for food later.

Step 2: Gather Texture Tiles or Stamps
A textured tile is basically a large rubber stamp. The texture tiles I have are grey rubber and made for working with polymer or precious metal clay. The best texture tile is one with deep impressions and wide openings.

Thin, delicate lines may not allow the resin to flow into all the cavities or may trap bubbles. This makes them less suitable for cookie cutter castings.
Tip: If you have a tile or stamp you want to try with this technique, you can test it first to see if it will work with resin. Pour a small amount of resin on the back (the unpatterned side) and let it cure. If you can peel the resin off easily, it should work with resin. But, if it doesn’t peel off easily, you can try it again with mold release. Should your trials show the tile or stamp won’t work with resin, you haven’t ruined it for other uses.
Step 3: Get Silly Putty
Yes, the kid’s toy, Silly Putty. Resin doesn’t stick to Silly Putty, making it a tough temporary molding material or a great way to seal a gap.
The color of the Silly Putty isn’t important.
Step 4: Get resin
I’m using Resin Obsession Super Clear resin for these projects, where I’m showing you how to use cookie cutters as resin molds. This resin for crafts works great in molds because it releases bubbles easily. The super clear resin is a 2-part epoxy resin with a 2:1 ratio. This means you need to combine two parts of part A and one part of part B. The super clear resin cures to a soft cure in approximately 6 hours, when it can be removed from a mold and set aside to cure. It cures to fully hard in 12-24 hours.
Because mixed resin has a limited amount of ‘working’ or ‘pot’ time (the time before it starts curing), it is best to prepare the molds for casting before mixing the resin. The super clear resin has approximately 25 minutes of pot time.

Step 5: Prep with mold release
Because the cookie cutters are metal, resin will bond to them unless you use resin mold release. You can also use release on the texture tile or rubber stamp to help make unmolding easier.
Place the cookie cutters into a container to catch the excess release, then spray. You don’t need a thick coat. A light coat is enough.

Step 6: [OPTIONAL] Add powders to the texture sheets
You can add powders, paste, paint, and glitter to the area on the texture tile you will use for the mold before putting the cookie cutter in place. For example, you can use gilders paste on the high areas of the texture tile. On the finished piece, this will accent the recesses.

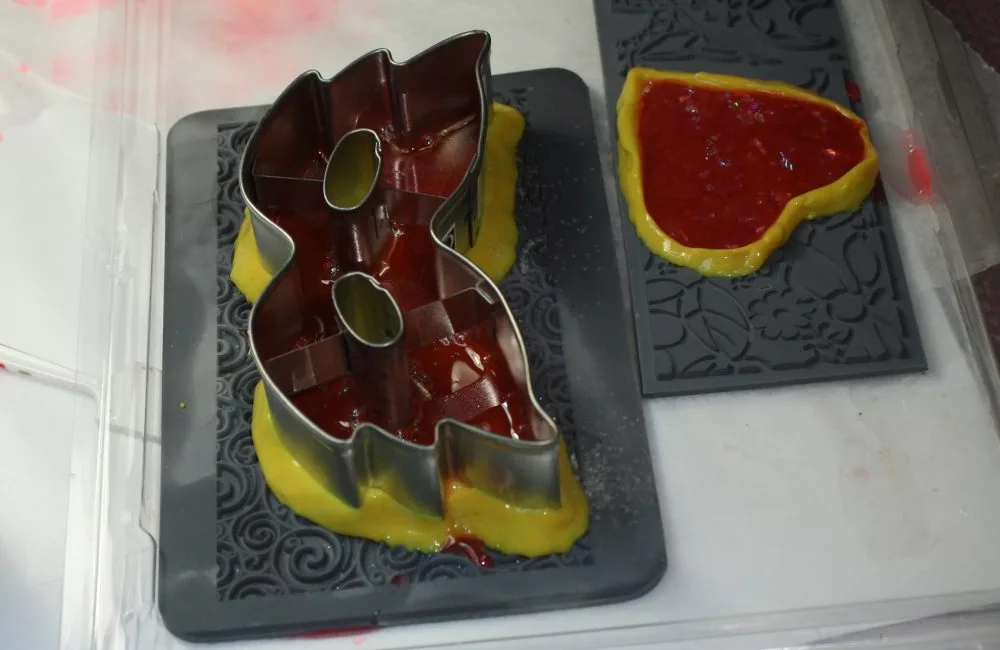
Step 7: Create the mold
Making the mold is as simple as placing the cookie cutter on the tile and sealing the gap at the bottom with Silly Putty.
Place the cookie cutter on the tile to frame the texture you want to see on your project. If the tile is narrow, ensure the cookie cutter is entirely on the tile and not hanging over the edge.

Make a Silly Putty snake and put it at the bottom of the cookie-cutter where it meets the tile.

Squish the Silly Putty around the bottom of the cookie cutter to make a seal with the tile and create a bezel-like opening.

If you’re using a more intricate cookie cutter, like this masque, make sure you seal each angle and inner cut area. Then, use the back of a paintbrush or stir stick to squish the Silly Putty into those places.

For less complex shapes, you can either remove the cookie cutter before pouring the resin or leave it in place. Cured resin is easier to remove without the cookie cutter. If you choose to remove the cookie cutter, be sure you don’t lift the Silly Putty from the tile while taking the cookie cutter out. You want a complete seal around the area you want to pour. Also, be careful not to distort the shape.

If you’re wondering what part resin colors play in using cookie cutters as resin molds, they can play a big part! After creating the mold, you can add additional glitter, powders, or other embellishments.

Step 8: Mix the resin
Now that the molds are ready, it’s time to mix the resin.
Gather all your resin supplies before you start. Cover your work surface with a sheet of wax paper to protect your work surface from drips and spills and make clean-up easier. Use Nitrile gloves to protect your bare skin from the sticky resin. For accuracy, measuring each part in its own cup is always best.
When using cookie cutters as resin molds, each mold will only need a shallow amount of resin. I generally mix 1 1/2 ounces or less. To make this amount of resin using the super clear resin, pour 1 ounce of part A in the first cup and 1/2 ounce of part B (hardener) into the second cup. If you are making a different amount, part A needs to be twice as much as part B. If you have never mixed resin before, read this article on how to mix resin.

Combine the two parts into one cup and thoroughly stir them together. Mix slowly to avoid adding bubbles. Be sure to scrape the bottom and sides often and the stir stick as well.

Mix the resin for at least 2 minutes to be sure the parts are well combined. Then, you can pour the mixed resin into another cup and stir for another minute to ensure a thorough combination.
Step 9: Fill the molds
Learning how to use cookie cutters as resin molds means understanding that you can only pour in a little bit of resin. Otherwise, you may not be able to demold it.
You want approximately 1/8 inch (or about 3 mm) of resin in your molds. If you remove the cookie cutter from the Silly Putty, only pour to the depth of the Silly Putty wall. Then, leave the resin to cure in a level location, preferably with a cover. The super clear resin works great even when it is poured into a thin layer.
I use wax paper-covered, low-walled rigid plastic pans under my tiles while making the molds and pouring the resin. This allows me to move the resin-filled molds to a curing location. There, I can cover them, so I can have my desk available for doing other things while they cure. If you move the uncured resin in molds, be careful not to spill it.

Step 10: Let the resin cure
For my curing location, I use a pair of cheap plastic letter trays lined with wax paper as shelves for curing projects. Resin generally doesn’t stick to wax paper. So if you have a spill, your resin project won’t become a permanent part of your curing location. I also use plant trays as covers for resin items because they’re cheap but keep dust and cat hair out of the curing resin. In colder months, I cover the whole area with a see-through plastic bin.
Resin cures best when the temperature is around 74 F (23 C). If your curing location is a bit warmer, the curing time may be decreased. If it’s a lot colder, the resin may not cure correctly at all.
Under my curing shelves, I have a heating pad and foil pan to add a bit of warmth to the curing location. Before I even pour the resin, put on the cover and turn the heating pad to high to warm the air where the resin will be curing.

Step 11: Demold
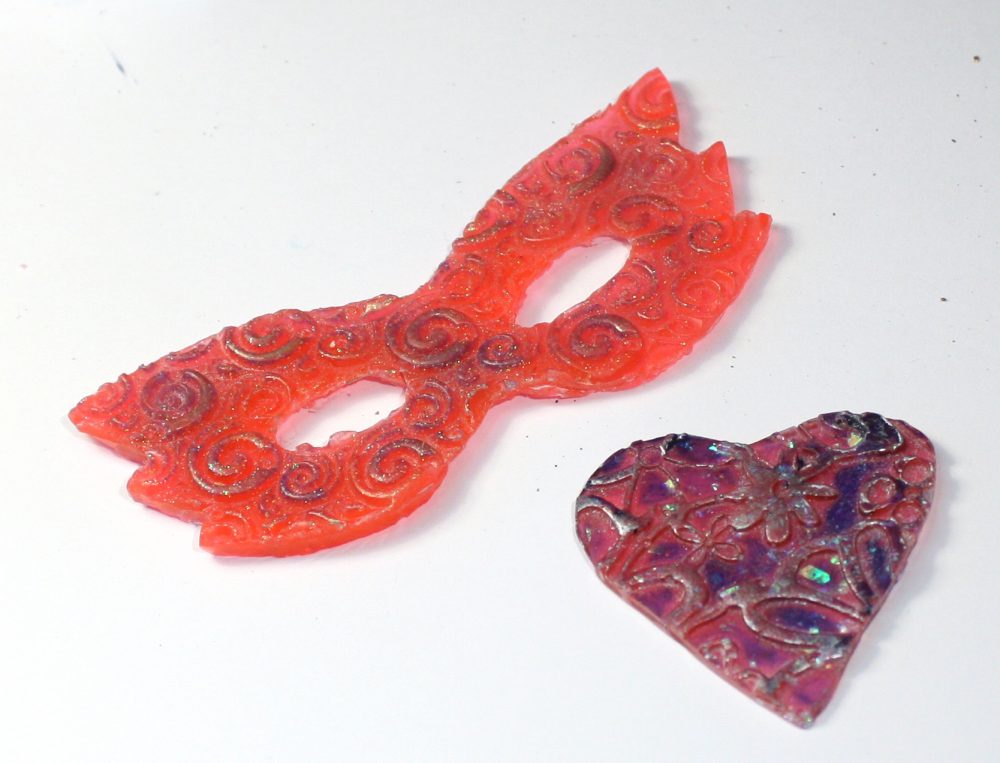
When learning how to use cookie cutters as resin molds, you need to be mindful of the resin soft cure time. The super clear resin cures to a soft cure that you can unmold in 6-8 hours. I like to unmold cookie-cutter castings at the soft cure stage and let them cure hard out of the molds. This allows more flexible options to remove extraneous bits from the casting.
Unmolding a piece without the cookie cutter is easy. Just bend back the flexible tile and pop the resin piece off the tile. Then, remove the Silly Putty. I always put the Silly Putty back into its egg so I can use it again later.

Unmolding an item cast with the cookie-cutter still in place takes a bit more effort. First, peel the tile off of the resin. Next, remove the Silly Putty from the tile and put it in the egg.

Next, pop the resin out of the cookie cutter. It can be hard to remove the cured item from the cookie cutter with some shapes. If you unmold when the resin is in a soft cure, you can carefully slip a craft knife around the edges to release the resin. Otherwise, if the resin is cured to a hard cure and is stubborn coming out, putting it in the freezer for 10-15 minutes can help. Applying a good coating of mold release at the beginning of the project makes this stage so much easier.

When you unmold items with colorant and glitter, the Silly Putty will often pick up some of the embellishments from the tile. You can generally pick these off before you use your Silly Putty again. For this piece, the Silly Putty didn’t have a tight seal on the tile all the way around. So, a bit of resin seeped underneath. You can also remove this from the Silly Putty.

Step 12: Clean up the edges
When learning how to use cookie cutters as resin molds, you must be ready to trim any resin that may have seeped underneath the cookie-cutter edge. If you remove your items from the molds when they’re soft-cured, you can trim away some of the edges with scissors.
Place your items on a flat surface and allow them to cure too hard, usually 12-24 hours. Once the things are cured hard, the edges can be sanded and finished.

To sand the edges of small molded items, I use a nail Emory board as my sanding tool. Go over all the edges of the piece to smooth off any sharp bits.

If you have an item with voids or holes in the surface, you can use a rolled-up piece of sandpaper for sanding them. Use a grit of 400 or finer.

Use a wet wipe to remove stray particles from your sanding before adding any additional finishing.

Step 13: Highlight details
Once your pieces are sanded, you can add paint or Gilder’s Paste if you want additional highlights for the texture.
Adding colorant as a finish may have a slightly different color than that put in the mold at the beginning.
NOTE: Color added after the item is cast won’t be as permanently melded with the resin and can rub off with wear.

Every unmolding is like uncovering a unique treasure. Some items look great on both sides without any additional finishing touches.
Want to learn more about resin?
Then you’ll want to get a copy of the ebook, Resin Fundamentals. For less than the cost of a resin kit, you’ll learn the essential details of creating with resin in only a couple of hours. Buy the PDF book now and get a download link in minutes.
Originally written by Kate Ledum
Unpublished Blog Posts of Resin Obsession, LLC © 2023 Resin Obsession, LLC
Will cured resin peel cleanly off of wax paper freezer paper or double sided tape?
Yes.
What mold release do you suggest?
I like the Petrolease mold release. You can find it in our store here: https://shop.resinobsession.com/collections/tools-and-supplies/products/petrolease-non-silicone-food-grade-mold-release?variant=965321777
You oils also use a hot glue instead of putty. On wax paper or packaging tape. Toodles debs from Texas
Oils?? Supposed to be can. Ugh. Spellcheck hates me! Lol.
if i didnt want to use a textured base, can i use packing tape-sticky side up to hold the cutter? would i still need the silly putty?
Probably not if you made a good seal.
You could use the back side of a silicon resin mould to put the silly putty on.
Would glycerin work as a release, as well? Funny story, I bought it online and by the time I got it I forgot why! This seems like a reason why.
Hmm. Haven’t tried that.
No! Glycerin is humectant, it gathers moisture. Its usually used in baking, but we crafters use it in stamp pads, inks and other things we dont want to dry up. So its basically resins mortal enemy, dont even try it. Im sure this answer is too late for you, but maybe this will help somebody else 🙂
Very interesting!! I love it. Goood idea.
I have a PLA cookie cutter. Will the resin stick to the plastic? I dont have a mould releaser. How will i get awqay with demoulding the item from the cookie cutter?
Hi Jenny, I don’t know if resin will stick to PLA or not.
We have mold release in our store here: https://shop.resinobsession.com/collections/tools-and-supplies/mold-release
Can ice cube or chocolate rubbery molds be used resin?
Yes Ester, but they may give leave a frosted finish on your resin.
The information that you provided in this article is great, but the items that you made are what old women crafters think are nice and beautiful, when in fact they are throwaway’s and are the main objects in the gabage bins at thrift stores.
Why so mean?
The old adage “If you have nothing good to say, better to say nothing at all” comes to mind 🤨 Why on earth do you think your opinion carries weight here? Move along troll 🤬
…and what do you think you will be one day? Well love, you are destined to be an old woman, unless you are dead of course. Don’t be so disrespectful.
thanks for the tips, I will look at the mold release. looks excellent, But do they come to Aussie?
As for old woman crafters, ie me — have you thought of these objects as “beauty is in the eye of the beholder.” many may have interesting uses??? inserting into concrete tiles on floor, chrissy decs, tree hangers in garden for sparkle and attracts birds etc.
Hi Elizabeth, we can ship this mold release to you in Australia: https://shop.resinobsession.com/collections/tools-and-supplies/products/castin-craft-mold-release-conditioner
so what would you use in the middle of a cookie cutter if you want to make an actual mold of the cookie cutter not just use as the mold itself. would you put silly putty in the center and then just pour what ever kind of casting mold to the cookie cutter.
Hi Patricia, you will need to find something to serve as the bottom of your cookie cutter, then make a mold of the bottom and cookie cutter at once.
Can u use oil spray inside two stainless steel bowls, one bigger than the other and one slips into the other to make a large bowl?
Hi Lee, unfortunately, that won’t work.
Can u use most any idea for a mold and slip it iut with spray oil.
I’m thinking of using saran wrap instead of wax paper. Does that stick?
I’m asking if I use a dry flower arrangement sponge with oil spray on the mold and wax paper on the bottom of the mold. Shove the cookie cutter or a can one bigger than the other into the flower sponge to ensure a better seal instead of silly putty.
Sorry so many questions.
Hi Lee, while I appreciate your ingenuity, I’m afraid what you describe won’t work very well. 🙁
Hi Kat, awesome tutorial, again!
Can you think of any replacements for the Silly Putty for us, who live in countries where there is no such thing? Ive only seen it on tv, looks like fun, but absolutely no idea what its made of.
And thanks for being you – youve given so much inspiration for us, just know it is well appreciated, dear 🙂 One more thing why Fridays are my favorite!
Good question Jane! Nothing else comes to mind right away, but this article might give you some ideas: https://resinobsession.com/resin-resin-resin/surfaces-resin-wont-stick-to/
How about play dough? I was thinking it has somewhat waxy or oily surface, maybe it can be added to the list? It would make an awesome temporary mold material too. If you havent tried it, there might be some experimenting in my future..
Hi Jane, unfortunately, play-doh doesn’t work as a non-stick surface.
Would the non drying, reusable modeling clays work as a non stick sealing dam?
Hi JP, unfortunately, they don’t. Resin sticks easily to modeling clay.
You can make silly putty with recipes found online.
Great instruction, Katherine. I would never have thought to use silly putty. Now, all of your students/fans know how to mold anything with tiny details. The putty will mold into all nooks and crannies. Thank you. ⚘
You’re welcome, Lorraine. 🙂
Enjoy your tutorials and i learn just as much from the comments after. I am off to find my man, woman & child metal cookie cutters to make some glittery bookmarks. I may even find a small silicon heart mould to pop in, leaving a heart shaped space after de-moulding. Love resins possibilities!
Yeah! I love reading this!
When you use resin release do you spray and let it dry? Or should I wipe it after it dries? When I let it dry all areas that left a dried spot also left spots on my resin distorting the appearance.
Hi Sheryl, you should let a release dry for 30 minutes or more after application. I show how I use resin mold release in this article: https://resinobsession.com/resin-frequently-asked-questions/resin-mold-release/
Would spring loaded cake tins work? Thinking it may be easier to release after resin cured?
Never thought of using silly putty as a mold. That’s a great idea!