

I’m going to say it. Resin Obsession has the most creative customers. I love it when they share the incredible crafts they make. Especially when they include the instructions so others can do it too. Bob T. of Colorado was kind enough to share how to add animal designs to wood coasters. This is a set he made for his nephew and the nephew’s new wife for a wedding gift. Take it away, Bob ——-
For this gift, I created 12 wooden coasters with 12 species of animals present in or native to Colorado.
Step 1: Get wood rounds

I started with 12 wooden coins of a species of pine that were between 2-3/4” and 3” in diameter and roughly circular. These wooden discs weren’t predrilled. If they were, it could be a neat way to make Christmas ornaments or resin jewelry. They all had bark on the rims.
Here are a few notes about buying the wood rings:
The color of the wood and the nature of the rings will be different depending on the species of tree that is used. Even though all the discs were pine, there are several different types of pines. I bought four bags of undrilled coins (25 per bag) to get twelve that were nearly the same diameter, plus not too thick or too thin. There are numerous sites where you can get wood slices of all of the same size and thickness, but they’re usually pre-drilled or painted white. The smooth, white surface would be an easier surface to work on (transferring a carbon paper tracing onto, using a Scorch Marker or Sharpie), but I was after the outdoorsy look of the tree rings.

I sanded each disc to 240 grit. Then, I downloaded free images of different species of wild animals. I chose 12 species with a face silhouette for one wood coaster side and a corresponding full-body outline for the other side.
Step 2: Transfer the design
I sized the 24 images and printed them off. Next, I used carbon paper to transfer the pictures to the discs. Then, I used a Scorch Marker Pro to color the designs and a heat gun to burn the images on the wood coasters.
You need to be sure the discs are completely dry (even though they are sold as dry). If you don’t, the heat gun will dry out, warp, and crack the wooden disc.
Also, the hotter the temperature, the darker the ‘scorch’ mark will be. But, get the heat too hot, and the wood will start to warp, crack, and smoke.

Here’s how a Scorch Marker Pro pen works if you’ve never used one:
The ink from the pen reacts to the heat gun’s heat. It causes a chemical reaction that is like burning the surface that the ink was on. The ink is colorless, so it’s difficult to see where it has – or hasn’t – been applied, much less if enough of the ink has been applied.
Because of the grain of the discs, the Scorch marker ink did not completely fill in the designs and burned unevenly. Because of that, I used a fine-tip black Sharpie permanent marker to fill in the designs. I went over each design with the Sharpie to have uniform darkness to all the designs. Then, I sealed both faces and the rim with Mod Podge.
In hindsight, I would just skip using the Scorch Marker and stick with coloring in the design with a black (or colored) Sharpie pen since I had to redo them all anyways.
Thoroughly seal the entire disc, both surfaces, and the rims. I painted the wood coasters with Mod Podge – but soaking them in a bowl of Mod Podge for a few minutes might be more manageable.
As you’re picking discs, not all are the same. There is considerable variability in the hue of the wood – ranging from a sort of golden to a bleached hue. There is also variability in the density, widths, and darkness of the tree rings. But that’s what makes each coaster unique.
Step 3: Add resin

To give a glossy finish to the wood coasters, I coated each disc, one side at a time, with Resin Obsession artwork epoxy resin. I brushed a resin layer on one side of each disc and let it cure. Then, I flipped them over, removed any drips, and brushed a resin layer on the other side. I repeated this until I had three smooth, even, drip-free layers on each side of each wooden disc.
Set them on Dixie cups to cure.
When cured, flip the discs over and repeat mixing resin and adding a new layer. Repeat as many times as you want until you get as many coats on each disc as you want. I stopped with three coats for most of the discs, but a couple developed some small drips that I had to remove and then apply a 4th coat.
If they aren’t fully cured, when you flip them over to apply more resin, the Dixie cup bottoms will leave a ring in your top layer of resin. This might not be a problem for the first 1 or 2 coats as the next coats fill in and hide the circles.
Step 4: Get a box
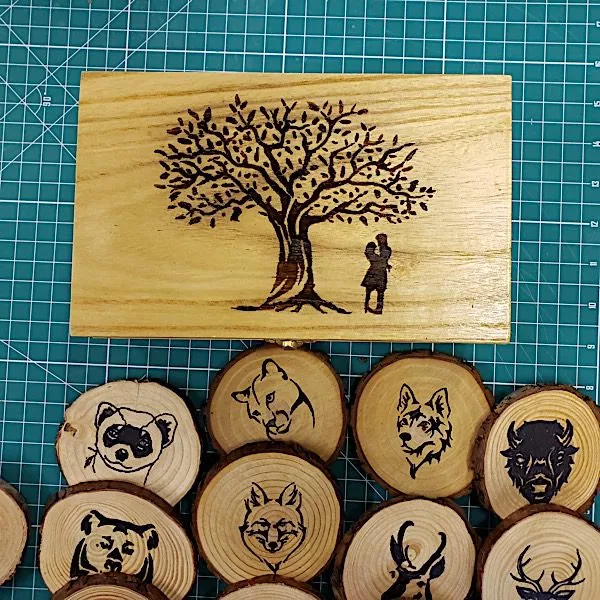
While I waited for the wood coasters to dry, I bought a plain wooden box made of Basswood to hold the coasters. I bought two boxes, which turned out to be prophetic. I found a ‘lovers’ design that went along with the theme of the plaque to put on the lid of the box. I sized it on my computer, printed it out, and transferred the design to the top with carbon paper.
I first tried carving the design into the lid – but that turned out to be disastrous. Way beyond my present skill level with a Dremel! So I reverted to using a Scorch Marker and the fine-tip Sharpie to draw the design on the second box. Finally, I sealed the design with Mod Podge. Then finished the box with four layers of polyurethane spray inside and out.

The wood coasters turned out great, and I would make them again. They fit nicely in two stacks of 6 coasters.
Remember how I talked about variability? It happens when you apply the resin too. If you compare the bison head to the bear head, you see some rings soaked up the resin more than others. The change and saturation of the hue added another uniqueness to each coaster.
This worked out very well because the diameter and shape of each disc didn’t matter – no need to have them exactly the same – and each disc is unique. AND I could fit all 12 discs into the box.
I didn’t want any resin to be sticky or soft, so I allowed the resin to cure for seven days. I gave these coasters to my nephew and his new wife a month after their wedding.
Another special thanks to Bob T for sharing this article!
When he isn’t busy making resin gifts, he’s a dog dad to Buddy and Pearl. They enjoy helping him grade papers and getting a breath of fresh air at the dog park.

Bob has another article coming soon with the other wedding gift he made with epoxy resin. 😉
Want to make coasters with resin but need more help getting started?
It’s why I wrote the PDF book, Resin Fundamentals. The book, written especially for beginners, helps you go from confused to confident with resin — in only a couple of hours. Buy the ebook now and get a download link in minutes.
Unpublished Blog Posts of Resin Obsession, LLC © 2024 Resin Obsession, LLC
Thanks Katherine and Bob. I love this project and as I live in Australia, I would like to do a set of Australian Animals including Kangaroo, Koala, Wombat, Emu, Tasmanian Devil, Goanna etc. If that turns out ok, I might do a series of Australian Floral Emblems and add colour with the sharpies.
I LOVE this idea Jo-anne. I would love to have a set of Australian animal coasters!
Loved this project! Thank you both, Katherine and Bob!
this was inspiring and full of useful tips. thank you so much for sharing
thank you so much for checking us out!