
 Here’s what I’ve learned in the eleven years I’ve helped creatives with their epoxy projects. The question you’ve been asking about how to layer resin is not the question I’ve been answering.
You know how sometimes you hear a question, and you immediately know how to answer it? Like…
How do you hide a column in excel?
I’m guessing you’re working with data and need to format some things. So an article like this is what I’d share with you.
But if you ask me
How do you hide a body in the woods?
Before I can answer, I have to decide on a scale of Regina George to Dory the Fish of how good of friends we are. Then, I’m daydreaming about the GOAT of true crime narration, asking me when I knew the dark force of evil was beckoning me to deception’s edge. So to be safe, I share this article on how to play hide and seek, which may or may not answer your question.
See the problem?
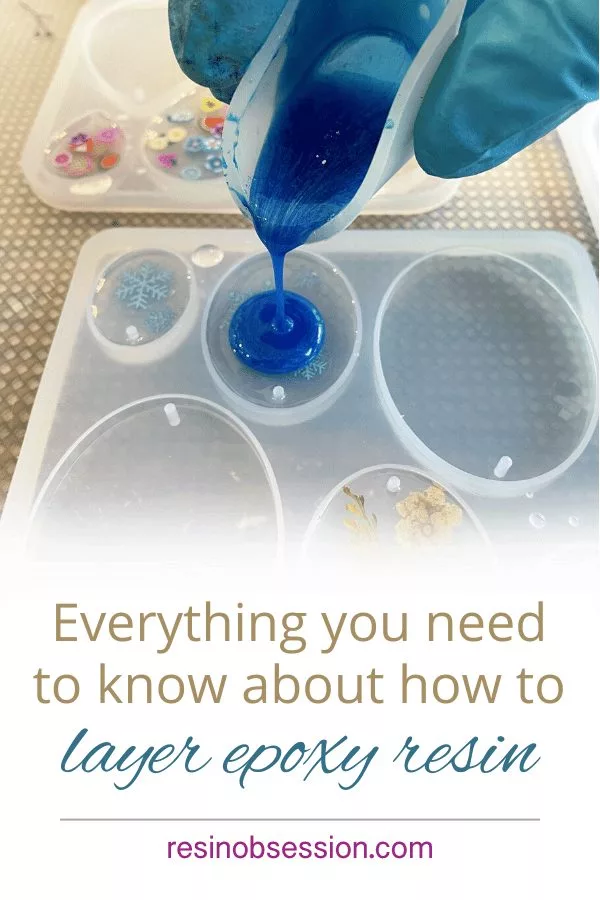
So when creatives ask how to layer resin, I’ve been answering the simplest way I know.
Pour a layer, then pour another.
Yes, it really is that simple. But I’m finding out there’s more you want to know.
So let’s take a deep dive into everything you need to know about how to layer resin.
Plan what you’re making
That means you’ve got to know
- What you’re putting in each layer
- Whether you’re working from the front layer to the back layer (or vice versa)
- And if you need to worry about lines between layers
(all of this will make more sense in a minute)
Pour your first layer
More often than not, when using molds, the first layer you pour will be the front after demolding.

That means if you’re putting something like a sticker in resin, you want the design side facing away from you. Because when you demold, you’ll see the design.
Pour your next layer
Now’s when you can mix and pour another resin layer, adding epoxy colors, glitters, beads, sprinkles, and other fun stuff. Mix and pour your resin to put over the next layer.
⭐️ BONUS: Here are 10 ideas of things to embed in resin.
When do you pour additional layers?
The safe choice is to pour the next layer once the previous layer is completely cured. The heat of layers is additive. Too much heat can make your resin flash cure.
But, by doing it this way, you’ll see a line between layers if you’re keeping your epoxy clear. To avoid that line, you’ll want to pour your next layer when the previous layer is semi-formed, like gelatin. This is called — you guessed it — gel time.

Do you have to sand between layers?
No, provided your surface is clean. If there’s any dirt, grease or oils, you need to clean the resin before adding the next resin layer. Otherwise, it won’t stick.
What if I sand the resin before adding a new layer?
First of all, you don’t need to do that unless there’s a problem. Like you’ve got dimples or fish eyes in your resin.
Most important — make sure you end sanding with a 1000 grit or finer sandpaper. Otherwise, you’ll have frosted resin underneath your new resin layer.
Do you have to use the same resin for every layer?
Probably. I say it like that because I’ve played around with pouring different epoxy types for different layers and haven’t seen a problem.
But why poke the resin bear if you don’t have to? Use the same resin for all layers if you can.
So what do you say we walk through an example of how to layer resin?
Here’s how to layer resin to make jewelry.
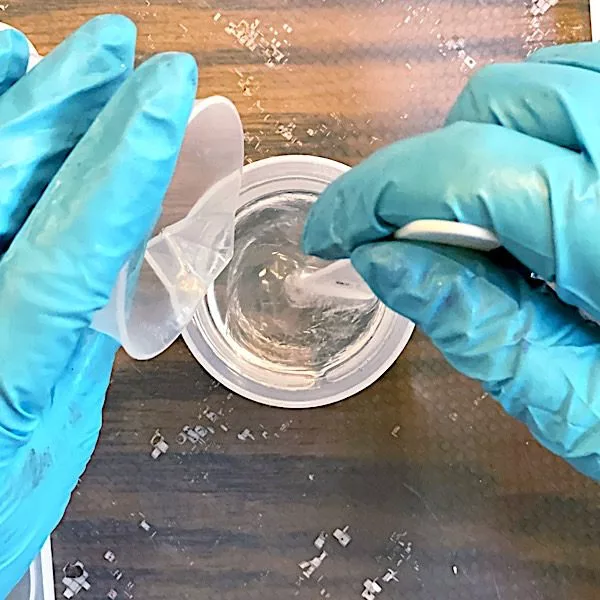
Step 1: Mix resin.
Because this project uses a mold, you need to use a resin designed for molds. That ensures your resin cures hard, durable, and bubble-free. (Because no one wants fizzy, bendy jewelry.)
That means I’m using the Amazing Clear Cast super clear resin.
Step 2: Add to the mold.
Stream your clear epoxy into the mold.

💡 Pro tip: Add less resin than you think you need. Pick up the mold and rotate it to cover the surface with resin. You want plenty of room to add more resin layers.

Here’s where you can add your stickers, beads, small amounts of glitter, or anything else. Don’t go overboard here, as you want to see the second layer through the first layer when demolding.

💡 Pro tip: You don’t have to mix glitter into resin to make cool designs. If you sprinkle it on the surface, it will rest there.
Check your resin for bubbles before letting it cure.
Since these resin charms will have a different color for the second layer, you can let them completely cure.

You should be pretty excited at this point, watching your designs come together. 😁

Step 3: Pour the second resin layer.
Mixing and pouring the second layer works just like doing the first layer, except now is when you can add more resin colors to accent your design in the first layer.

And you’ll add it to the epoxy already in your mold.
Then check for bubbles before letting it cure.

Your molds should now look something like this.
Continue this for as many layers as you want to make.
Step 4: Demold
Pull your charms from the mold.

From the front, you’ll see something like this.

And from the side, you’ll see this.
And that bestie, is how you layer resin. 🎉
Here are the charms I made from this day of resin craftiness:


Want to learn more of the resin basics?
Then you want to get your copy of the ebook, Resin Fundamentals. Instead of doom-scrolling for hours trying to sort through tons of information, learn everything you need to know to about epoxy in only a couple of hours. Buy the PDF book now and get a download link in minutes.
Unpublished Blog Posts of Resin Obsession, LLC © 2023 Resin Obsession, LLC
Wow! Thank you for this information. I’m new to resin and I’ve been leaving the question of how to avoid the layer line and until this I never got an explanation. Thank you for explaining this like I was a 5-year old. That’s my level of understanding at this point in my resin journey.
Hi Sheil, I’m glad you found this helpful.
I loved this article and I also enjoy your humor. 😉
Oh, thanks much. 🥰
Veeeeery new to resin here but can’t wait to start making things! I just want to read up as much as I can first 🙂
So the layer with the charms you say to let cure then go back and do the glitter layer.. so does that mean do the charms half of a mold then go back a day or so later and fill the 2nd half of the mold with the glitter/colour resin mix? Or can it all be done in one sitting. Also need to learn how much patience to have with the craft 🤣
Hi Becky, welcome to the world of resin! You’ll need to wait until the first layer is at least partially set (or all the way cured) before you pour the second layer. Otherwise, the two layers will mix together.
OK reaaally stupid question again…how longs the best time to wait? 24 hours? Also do you have to do them seperate or can the glitter/coloured resin mix not so straight in with the charms?
Also if I wanted to make something with a little shell sealed in it like a necklace do I need to do anything to the shell? Thankyou 😀
What happens if you make your layers too thick? What is the ideal depth of a layer? I am using a skull mold and my first layer is 1 1/2 inches. Im worried I used too much. Its starting to gel after 45 minutes.
Hi Jim, depth pour varies between resins. If you pour it too thick, it can flash cure. This article explains more: https://resinobsession.com/resin-frequently-asked-questions/why-does-resin-flash-cure/
Hello,
I’m just wondering what the benefits are to this method of resin crafting versus using a resin that cures under a UV light which is a much, much quicker method. I’m a newbie at resin art, so I apologize if this is a question with a very obvious answer; It’s not obvious to me. lol
Thank you for your time!
Hi Joanne, I don’t like using UV resin. This forum post explains more: https://resinobsession.com/forums/topic/uv-resin/
Can you do a design with uv resin then top it with your epoxy resin? I understand the curing times etc but will the epoxy cure over the uv. I’ve read on your other post you can do uv on top of epoxy but I want to do the opposite (-:
Thank you
Hi there.
New to this and wondered if I layer clear resin then cure it, then go on to add a few beads, can I draw on or write on that resin layer then follow with the top up layer on clear resin, to encapsulate it all within??
Can I use that same process on a table? I did a layer with pictures etc. and I want to add just a couple more and sand down some parts that did not dry completely flat. How should I do this?
Yes, Tiffany, you can use the same steps.
How do you avoid your resin “beading” up on your first layer. When working with silicon molds, I’m having a hard time getting the resin to level when it’s a thin layer. It will form beads or droplets. I’m guessing it’s because silicone is nice and slick. I’ve tried warming the resin, and different types of resin, but it always beads up unless I fill the mold more than I want.
Hi Annie, you can pop the beads/bubbles with a heat gun or by spritzing with a little isopropyl alcohol.
I think this is what I needed. I’m doing a plaque and wanted gold resin in the recessed letters with black on top. As I recall the instruction video, she used a syringe to fill in the letters and wasn’t that careful because it would add to the look. And of course, I can’t find that video! I don’t remember about curing before adding the black.
You would want it to be slightly set (not fully cured) before adding the black.
Hello.
I had made some resin items before but this time it didn’t set. Could it be the resin was old?
It’s always possible. Try using a new bottle, the correct mixing ratios and allow it to cure in the optimal temperature. Happy Crafting!
I have a question.. I’m getting ready to start pouring. When we apply micro powder to areas in mold what else may be used? I don’t understand how how this works. Thank you!
Hey there! There’s a couple of ways to color your resin, you can dust the mica powders directly onto the mold or mix it into the resin first then pour!
Can you recommend a good resin for deep pour and ones tha do not yellow.
Yes! I love Promise Deep Pour! Never yellows and gives a great clear finish. https://shop.resinobsession.com/products/resin-obsession-deep-pour-epoxy-resin-river-table-resin
Hi. i am wanting to create a river effect with a piece of wood that i am shaping into a walking stick. however the stick has a bow which has about a 70-80ml rise / fall. the length of the 25mm channel into is about 600mm long.
any ideas how i can do this please will be welcomed.
jon
Using a quick coat or fast cure resin and having it spin similar to a tumbler would be the best options!
Hi, I created what I think is a deep pour (about 2” thick), a 5×7” rectangle with an arched top. In it are the flowers I preserved in silica crystals from my sister in laws baby shower, and her daughters name and birthday carved from wood. I poured a total of 4 or 5 layers to set the flowers & wood lettering in a very dimensional effect. Unfortunately, I must have had the final layer just off on my 1:1 A&B ratio causing it to remain gooey for days. I used alcohol and a spackle knife to remove the gooey resin but now I’m left with a shallow, frosted crater in the center about 1/16-1/8 of an inch deep. I’m thinking my next step is sanding to level it all out and hope that doesn’t expose the tips of my taller roses. If it does, I’ll need to polish & then pour again? Will a pour after a polish work? I’m concerned about trapping a frosted resin layer under the top layer as that would ruin the design. Appreciate any tips! I’ve poured 1 mold before preserving my wedding flowers of similar size with no resin curing problems, but I haven’t ever sanded and polished, or attempted to “fix” a resin art disaster.
It sounds like you’re taking on an incredibly meaningful project! Here’s how to approach fixing your resin piece:
1. Assess the Depth
First, confirm the depth of the frosted crater and whether sanding might expose parts of the preserved flowers or wood lettering. If sanding risks exposure, you’ll need to skip leveling and focus on re-pouring.
2. Sanding
If you’re confident you can sand without exposing delicate areas:
Start with Wet Sanding: Use wet/dry sandpaper, starting with 320-400 grit to smooth out the frosted layer. Work in small, circular motions, keeping the surface wet to avoid overheating.
Gradually move to finer grits (up to 1000-1500) for a smoother surface.
Be cautious not to sand too much into the preserved elements.
3. Polishing (if necessary)
If the frosted layer remains visible after sanding:
Use a plastic or resin polish with a buffing pad to restore clarity.
Avoid over-polishing, as the next resin layer will hide minor imperfections.
4. Cleaning Before Pouring
Thoroughly clean the sanded surface with isopropyl alcohol to remove dust and oils.
Ensure the piece is completely dry before pouring.
5. Final Pour
Mix your next batch of resin carefully, ensuring a precise 1:1 ratio and thorough mixing to avoid tacky spots.
Pour a thin flood coat to fill the crater and create a smooth, glossy surface. If you’re worried about frosted areas showing through, ensure the previous surface is polished to clarity.
6. Bubble Management
Use a torch or heat gun lightly to remove any bubbles.
Cover your piece with a dust-free dome or box to allow it to cure undisturbed.
Notes on Success
If you’re still concerned about the frosted layer showing through, test polish and pour techniques on a small piece of scrap resin.
A re-pour after polishing works well as long as the surface is clean and free from oils or debris.
Take your time and trust the process—you’ve already done amazing work with the dimensional layering! Let me know if you need further clarification or tips.
Hi Katherine
Love all your tips and articles and the cool delivery of them!
Keep ‘em coming….
Geoff