
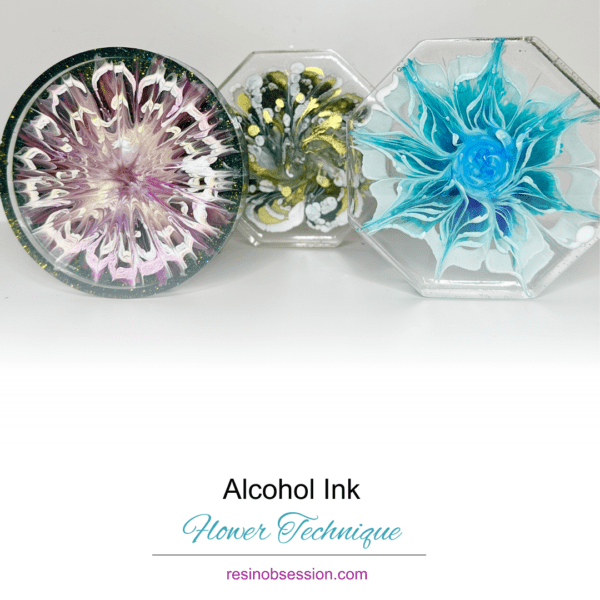
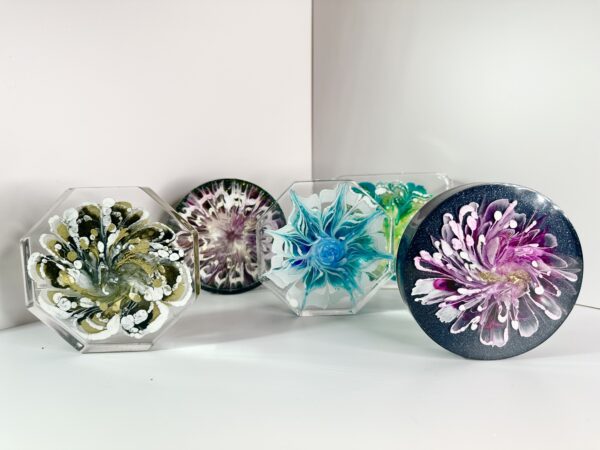
The alcohol ink resin flower technique is a unique method for creating vibrant, ethereal floral designs within a resin medium. This technique leverages the natural tendency of alcohol inks to spread and interact with resin, resulting in stunning, flower-like patterns. Here’s a detailed overview of how to achieve this effect:
Materials Needed
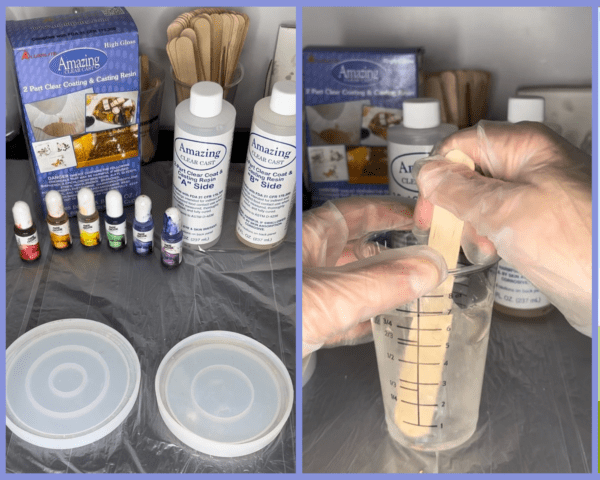
- Amazing Clear Cast Epoxy
- Color Creator alcohol inks in various colors
- White Alumilite Dye or a blending solution
- Silicone molds (flat or shaped, depending on the desired result)
- Mixing cups and stirring sticks
- Protective gloves and eyewear
- A heat gun, lighter, or torch
- Toothpicks or needles
Step 1: Preparing Your Workspace
Ensure your workspace is clean, dry, and well-ventilated. Cover the surface with a protective sheet or wax paper. Gather all your materials, so they’re within easy reach. Safety is paramount when working with resin and alcohol inks, so make sure to wear gloves and protective eyewear.
Step 2: Mixing the Resin
Start with mixing your Amazing Clear Cast. Depending on the mold you’ll want enough for a base layer in your mold and set aside 15-30 ml (about half to a full medicine cup) of ACC. Here comes the patient part. Let the mixture sit for 10-15 minutes. There are two purposes for this. First, as it sits, air bubbles will rise to the top and dissipate. The second (and more important) you want the epoxy to thicken a little and warm up. Remember with ACC you have a minimum of 30-40 minutes for work time so its OK to be patient here.
Step 3: Pouring the Base Layer
Pour a thin layer of clear resin into your silicone mold. This base layer will be the canvas for your alcohol ink flowers. Use a heat gun or torch lightly over the surface to remove any bubbles. Allow this layer to partially set. I waited another 15 minutes after pouring, but this also depends on which resin you are using.
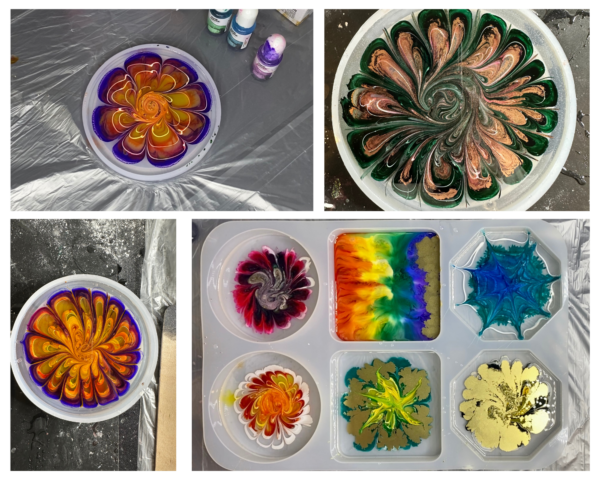
Step 4: Adding Alcohol Ink
Once the base layer is tacky, start adding drops of alcohol ink onto the resin surface. You can use a single color or combine different colors to create a more complex flower pattern.

Step 5: Mixing your blending solution.
Remember that extra resin you set aside? Add your white dye to this mixture. Stir and add to a sandwich baggie moving the resin to either corner of the baggie. It’s important to use the right colorant here because you want the white ink to be dense, so it will push the colored alcohol ink outward, creating petal-like shapes. Cut a very small hole in the corner of the baggie and use it as if you were squeezing frosting out for a cake.

*NOTE* Please take note that the temperature of your epoxy is crucial to its success. It’s recommended to have the temperature of your piece at around 95F before piping. For me, it takes 10 minutes after stirring and another 10 minutes after pouring the base into my mold to reach that temperature. I can easily tell when I added too soon or waited too long, as it affects the tackiness and solidification of the epoxy. Additionally, it’s worth noting that the brand of epoxy you use can also affect the timing and viscosity. After a few failures, I learned the timing and viscosity of ACC epoxy pretty well.
Here are also a few different circular shapes you can try to get different types of petals.

Step 5: Shaping the Flowers
Once you’ve added the white over the alcohol ink, use a toothpick to manipulate the ink into more defined floral patterns gently. You can swirl the ink or drag it outward to mimic the look of petals. Work quickly, as the ink starts to set soon after touching the resin.
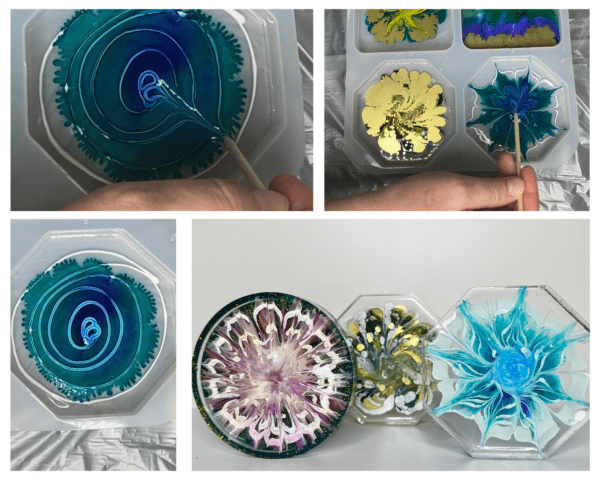
Step 6: Adding Depth
For added depth, you can wait for the first layer of ink to partially dry and then add more drops of ink on top, repeating the process to create layered petals. This step is optional but can add a beautiful complexity to your flowers.
Step 7: Curing
Once you’re satisfied with your design, allow the resin to cure completely. This could take anywhere from 12 to 24 hours, depending on the resin brand and environmental conditions. Then add your final layer over your base. You can pigment this layer or leave it clear.
Step 8: Demolding and Finishing
Carefully remove the resin piece from the mold.
Tips for Success
- Experiment with different colors and techniques to create a variety of flower effects.
- Use a small amount of ink to avoid overpowering the resin with too much color.
- Practice on small pieces before moving on to larger projects. Odds are your first flower won’t be perfect. That’s OK. Trial and error are key here.
- Remember, every piece will be unique due to the fluid nature of the materials.
The alcohol ink resin flower technique is a rewarding way to create stunning, one-of-a-kind pieces that capture the delicate beauty of flowers in a durable, lasting medium. With practice, you can refine your technique to produce intricate and detailed floral designs.
Get your copy of the instantly downloadable book, Ten Epoxy Craft Projects. You’ll get inspiration for the days you need resin ideas. Buy the PDF book now and you’ll get an email download link in minutes.
Blog Posts of Resin Obsession, LLC © 2024 Resin Obsession, LLC
This is a very nice, informative tutorial post. Hope to try it soon. Thank you for posting.
Awesome! Let us know if you have any questions!