
 Did you know you can make resin art that has a functional purpose? Besides bringing joy and enlightenment to your day. I’m going to show you how to make a resin clock.
Supply list:
Wood round
Watch face mechanism
Drill and drill bits
Primer paint
Painters tape
Resin Obsession crystal doming resin
Resin Obsession opaque epoxy pigment colors
Mixing cups
Stirring sticks
Safety gloves
Non-stick surface
Heat gun
Metallic spray paint
Foaming dish soap in a spray bottle
Acrylic paint

Step 1: Select a wooden round
Pick a round to fit the space where you want to hang your resin clock. I’m using a 6-inch wide by 1/2-inch deep round. After you know the depth of the wood, get a clock face to fit. Be sure you buy the hands, screws, and other implements to assemble the clock after finishing.
💡 Pro tip: Mechanisms are not one size fits all. You must be sure the mechanism center can go through the wood and have enough room on the other side to hold the clock’s hands.

Step 2: Drill the center
Find the center of your circle.

Then, drill a hole to fit the clock face mechanism.
Step 3: Prime
Use the primer to paint a couple of layers to the wood. Unprimed wood can release bubbles into your resin.

💡 Pro tip: If you’re using dark colors, add that color to the wood too. That will give your colored epoxy a richer hue.

Step 4: Add tape
Add painter’s tape to the backside of the circle. Don’t forget to cover the hole too.

Step 5: Prep the wood
Place the wood on a mixing cup on a non-stick surface. Check the surface for levelness. You don’t want your resin pooling on one side.
Step 6: Pour resin over the clock surface
Mix the Resin Obsession crystal doming resin. If you use our resin calculator, you’ll know you need 1 ¼ ounces for a round this size.
It’s important that you use a doming epoxy for art for this project. Otherwise, your resin clock will cure with a bumpy, uneven surface.
⭐️ BONUS: If you’re new to epoxy, we’ve got an easy guide on how to mix resin.
Then, divide the resin into three cups and color them with opaque white, black, and the two together to make gray.

Apply the colored epoxy to the clock face surface.

You can use your stirring stick to spread the resin over the clock surface.

Add colored resin to the side of your clock too.

Go over the wet epoxy with a heat gun. Not only does this pop bubbles, but it pushes the colors around to make cells.
Then let the resin dry for 24 hours.

Step 7: Make metallic cells
Set your resin-coated clock base outside. Squirt the surface with foaming dish soap.
Then, mist metallic spray paint over the soap. Let the paint and soap mixture dry for 24 hours.

Step 8: Finish
Use rubbing alcohol and a polishing cloth to remove the soap residue. It’s okay to put hard pressure on the resin clock to get the surface clean.

Then, remove the painter’s tape. Vice grips are helpful for the stubborn spots.

Add colored acrylic paint to the edge.

Step 9: Assemble
Add the clock hardware to the face.

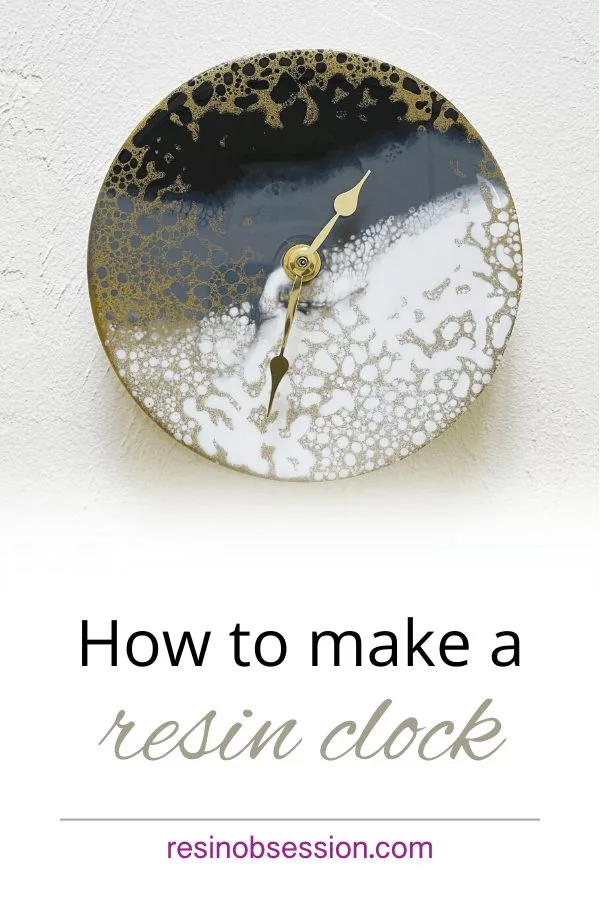
Ta-da! You just learned how to make a resin clock.

I love the detail of the lacing over the resin colors. I love the contrast between the matte of the paint and the shine of the resin.
If you want your resin clock to have a uniform shine, add another layer of clear epoxy to the surface.
Want to fast-track your resin success?
It’s why I wrote the ebook Resin Fundamentals. So instead of spending your time on effort learning by making mistakes, you can learn from mine! It’s the book I wish I had when I began with resin. Buy the PDF book now, and it’s yours to read in minutes.
Unpublished Blog Posts of Resin Obsession, LLC © 2023 Resin Obsession, LLC
Loved this !! I Will make one for my Craft room ! Thank you !
That’s awesome, Nancy. I can’t wait to see yours!
Can you use the foaming soap and spray paint on something that doesn’t have a wood back? Like a resin piece of jewelry? Before the bezel or pin back is added? That was so cool!
Hi Rosemary, I don’t see why not. If you try it, will you let us know how it goes?
I think I will!