
Even when you’re very careful and very experienced, you may find yourself asking yourself how to fix bubbles in cured resin.
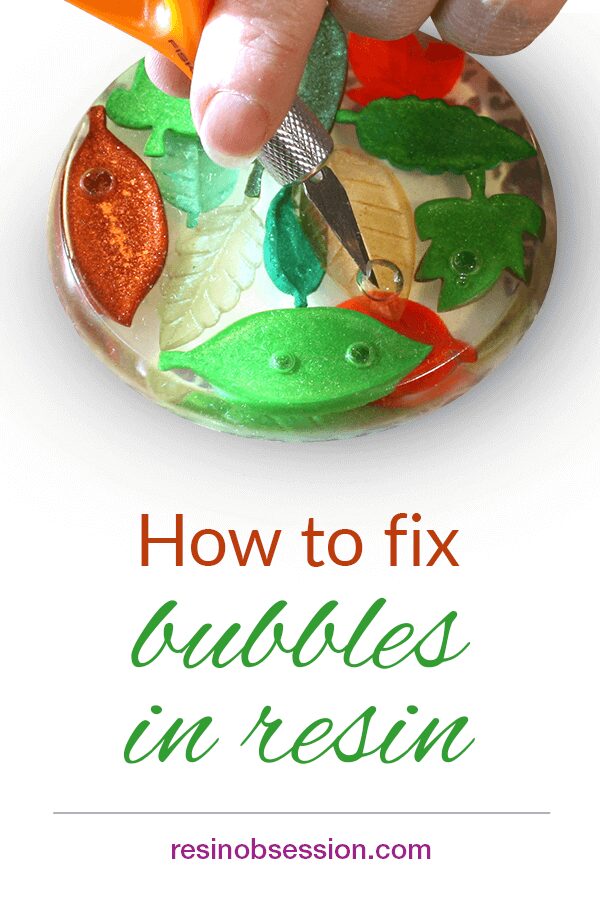
Unfortunately, when making resin coasters, I had one end up with bubbles underneath the leaves.
What happened to trap bubbles in the resin?
Because the leaves of resin had an edge, it made it easier to trap bubbles underneath. I should have looked under the mold while I was putting them in.
Bubbles can also form in resin after you add your charms and other items, especially if the air in the room is chilly. I live in British Columbia, Canada, and it was a bit cool when I made these coasters.
How to fix bubbles in resin.
In this case, the bubbles occurred on what will be the bottom of the resin coaster, so they will be easy to deal with.
Step 1: Cut out the bubbles.
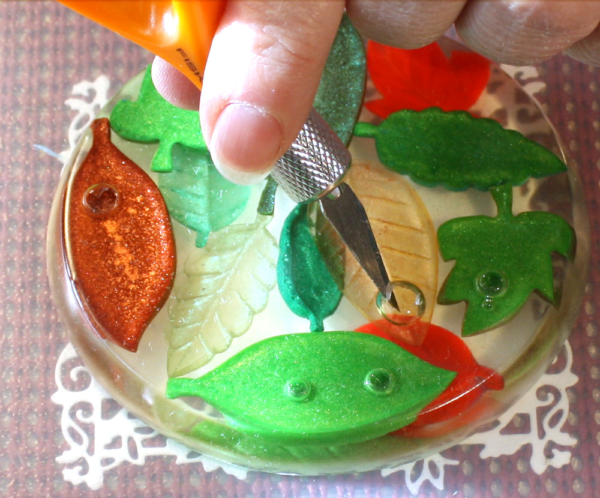
With a sharp knife, cut around the bubbles so they’re open and can be filled like small molds.
Step 2: Mix more resin.
Mix more epoxy resin. Use the same epoxy type as you did before. If you don’t want to mix up a full batch just to fill in a couple of bubble holes, you can set the coasters aside for when you’ve got leftover resin.
Step 3: Raise your surface.
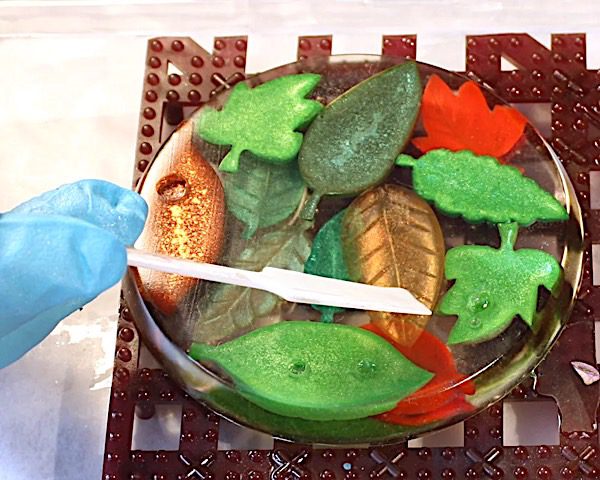
Put your resin piece onto a curing rack. The curing rack has bumps to elevate the curing piece. So if there are any drips off the side, it won’t pool under the coaster, which is the front, and ruin it completely.
Step 4: Fill the holes.
Using the stir stick, carefully fill each bubble hole. When it cures, the resin will bond completely, and the hole will magically disappear.
But don’t forget to check this new resin for bubbles. You don’t want to have to fix bubbles in your NEW batch of cured resin.
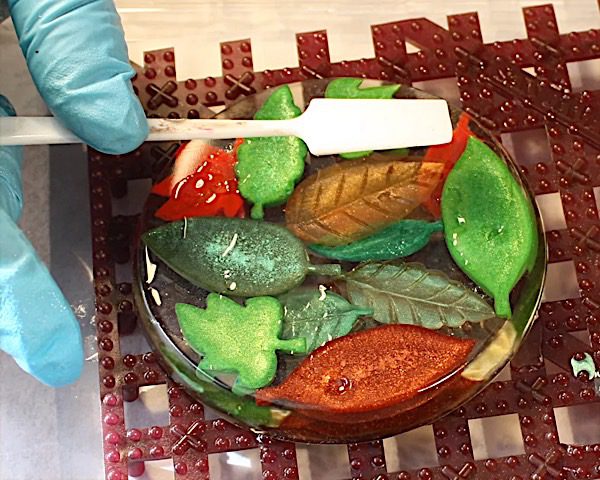
Step 5: Glaze the surface.
Since the bottom of the coaster has a matte finish, and the hole repairs have a shiny finish, glaze the bottom shiny to hide the former bubbles. After filling the holes, coat the entire surface with a thin resin layer, much like a glaze. We’re not trying to create a dome, just enough to cover the whole surface with wet resin.
As an added benefit, the shiny finish on the bottom will also make the finished coaster look ‘clearer’ from the top as well.
If you’re having resin bubble trouble, you’re not alone. It’s the number one question we get at Resin Obsession. Learn what you can do to avoid bubbles resin: 10 tips for getting rid of resin bubbles.
Worried you will never get this resin thing right?
Go from confused to confident when creating with resin. Get your copy of the instantly downloadable ebook, Resin Fundamentals. The PDF book teaches beginners everything you need to know to be successful with resin. Buy today and have a download link in minutes.
originally written by Kate Ledum
Unpublished Blog Posts of Resin Obsession, LLC © 2023 Resin Obsession, LLC
Thanks for this article! I know bubbles can make me crazy when I am working on a resin piece with photographs in them since who wants bubbles on a photo.
I added a photo and there appears to be a large air bubble under the front of the photo. It’s layered resin so I’m sure the bottom is cured. How can this be fixed?
It’s nice that you are able to repair the piece.
i fan a propane torch over the bubbles to heat the gas within them to expand the bubbles to their bursting point. keep in mind to always keep the torch moving. stopping over a bubble will burn the clearcast. keep the torch moving over the surface and watch them disappear.
My name is Rob , I made a plaque with a picture In it, and after a few months, The picture has a bubble In it. How can I get rid of it ? I used a 2 part bar finish.
I’m afraid there is no easy way to get rid of it. Did you try the techniques shown in this article?
I’ve been putting metal earth ships in resin; experimenting as new to this. Larger air pockets I can take a small pin drill bit, drill a hole then use a smaller gauge syringe to inject resin into the cavity, backing the needle out as to fill in the drill hole as I go.
I recently fixed some air bubbles in a resin glass picture by using a needle to “pop” the bubble the pouring a slight coat of resin over the picture again. I also saw a tip about lightly spraying acetone over the picture to bring up and pop any bubbles – I have to admit using both of these methods gave me the best result I have ever had with working with resin and having no bubbles.
Wow, Chris, that’s great news!
Hi Katherine, I hope this doesn’t sound odd but I need bubbles in my resin. As I read comments, I’m assuming I can get some bubbles by doing the opposite of the suggestions? Thx. DN
Hi Dani, yes you can! The easiest way to get bubbles in your resin is to wait until the resin starts to get thick, then whip it like you are making scrambled eggs. 😉
Hello Katherine, I made a round coaster and after it cured and I took it out of the mold the top had a crack in it (uneven surface). What did I do wrong and can I pour more resin on the top to even it out?
Hi Jeanne, it’s hard for me to say why there was a crack in the coaster without seeing it, but it sounds like something you can repair with another layer of resin.
Hi Katherine,
I recently complete a garden ornament using epoxy resin. Every this was fine after 3 day since completion and the resin appeared to have cured however, when I looked at it this morning a huge bubble had appeared under the surface. Do you know what could have caused this and how to correct it? I have before and after photos uf needed.
Many thanks
Hi Andy, I’m sorry this happened to you. It sounds like there was trapped air within the garden ornament that released after curing. I’m afraid there isn’t a way to correct it. You will need to remove the resin and try again. 🙁
Thanks Katherine,
Would it be possible to drill down through the top layer and into the bubble and the pour a thin lay layer over the top?
hi there – i made a beautiful bangle with flowers from my garden. However the flower centre bells in a couple made a bubble hole on the outside of the bangle. I am planning to fill them by putting the bangle in a vice at the correct angle so that there is no overflow. BUT how do I smooth it all off at the end? I cant do a total pour coat over it all..
Hi Merrily, it sounds like you need to do some sanding. This article explains how: https://www.resinobsession.com/resin-frequently-asked-questions/how-to-sand-resin-smooth/
Hello;
I made resin coasters using a mold that has diamond cuts on the sides and top flaps inwards. Underneath the flap (don’t know what’s the right word for it, formed large bubbles. I soaked my resin 15 minutes in warm water, used my torch gun, sprayed alcohol and nothing seemed to help. I feel horrible for wasting all that resin, pigments, time.. is there a solid solution to this?
Hi Lara, this article will help you with getting bubbles out of resin: https://www.resinobsession.com/resin-frequently-asked-questions/resin-bubbles/
I’m putting powder coated steel disc in resin coasters for a local company. I’m doing it in layers, once the I put the disc in I’m getting rather large bubbles on the back of the disc, how can I fix these or prevent this from happening? I’m using casting resin, my resin is warmed and I’m using a pressure pot at 50 psi.
I don’t know if this would help, but I recently tried to enclose some little dollhouse bricks, but they caused bubbles because they were so porous. What worked for me was “painting” then with resin and letting it dry, then enclosing them once they were sealed.
I used resin for making dice, but I have many small bubble and on some dice these very big bubble. How can I fix them since it’s not a flat surface. Is there anything that would make it easier to repair them? They were my first time using resin so I’m just a beginner.
Hi Alexanne, there are some tips for you in this article: https://www.resinobsession.com/resin-tutorials/how-to-make-resin-dice/
I am making custom TV tray tables and I’m having the biggest issue with bubbles. The tables are usually spray painted, I use vinyl, and photos. The bubbles are not usually around those things added for decoration, they’re just everywhere. It’s very frustrating.